
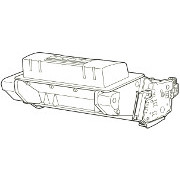
HP Original Cartridges
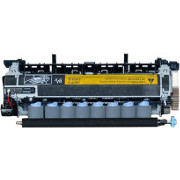
HP Maintenance Kit
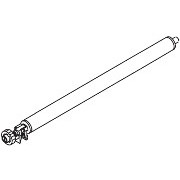
Transfer Roller
Reliable Remanufactured Cartridges
One of the merits of the P4014 against a new printer is the low cost of good re-manufactured cartridges.
At the moment we don't sell in the US, but we hope to soon
Installing CB388A or CB389A maintenance kits for HP P4014 P4015 P4515.
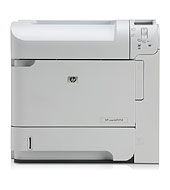
HP Part CB388A (110 Volt ) and CB389A (220 Volt) are the maintenance kits for the HP LaserJet P4014, P4015 and P4515 printers.
The kits are not very different from those for the LaserJet 4200 and 4250 series and anyone who has experience of those printers will find things almost unchanged. However they aren't electrically compatible, the newer printers are faster and take a slightly redesigned fuser. The fuser also has black plastic paper-path mouldings instead of white.
The P4014 series fusers look pretty much like M601 series fusers CF064A and CF065A. They even fit in the hole but they don't work. Since the P4015 and P4515 printers look pretty similar to the M601, M602, M603 confusion is possible.

Maintenance Kits
Maintenance kits are provided for mono laser printers as a way to change most of the parts that wear out. Changing these parts will prolong the printers life indefinitely; this class of business printer can survive for well over a million pages. Cartridges wrap up the consumable toner and fast wearing drum in one easily installed unit. A maintenance kit provides the fuser and a set of rollers. With a maintenance kit installed the working parts of the printer have essentially been renewed so if it is cleaned at the same time it is effectively good as new. In fact it may be better than new because people don't have to learn new skills to go on using these printers. Switching between brands of printers is often surprisingly disruptive for little benefit.
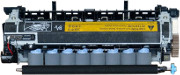
The HP official maintenance kit comes in a box made up for HP. (In Europe the label might say they are packed by ModusLink). The box contains a fuser, a transfer roller and a set of feed rollers. There may be rather more rollers than are actually needed. The kit for the P4014 currently seemed to have 8 feed-separation rollers in 2013 enough for a printer with a set of optional expansion trays. If the rollers aren't all needed at once they can be kept to solve paper feed problems in future. The kit doesn't contain the pickup rollers at the moment, probably because they do not wear so much. Kits of pickup rollers are available separately as CB506-67904 (for Tray 2, 3, 4, 5 ) CB506-67905 (for Tray 1) and both can be bought here.

All the parts in the P4014 maintenance kit are easily changed. Both the fuser and the rollers clip into place, there is no screwdriver work. It will be helpful to do a maintenance kit reset on the printer, to keep track of when the last was fitted and clear any messages (more below).
Maintenance Kit Cost
Maintenance kits for big printers can look expensive - around the £200 mark, for a mere spare part.
As people sometimes point out, these maintenance kits are more expensive than some printers. They are more expensive than a cheap little printer with print costs over 2p per page (often over 3p). These printers work at 1p per page or less if you use the large cartridges. The Maintenance kit makes hardly any difference as despite its £200 cost it lasts for 225,000 pages or so - and the net effect is just about 0.1p per page. The price is not totally negligible but is lost amongst other low-level costs such as power consumption, paper wasteage, and the cost of fault-finding with other printers.
You can cut costs significantly by using refurbed kits; we do sell them. To be honest we would prefer HP to lower the price of the kits; we doubt the cost is entirely justified. However these fusers won't be cheap, they are nicely built.
Prevention or Response
Maintenance kits can be treated as preventative maintenance or as a response to a specific fault.

Preventative maintenance kits are usually fitted when the printer reaches a page-count which implies it will begin to give trouble shortly. As preventative maintenance the kits should probably be fitted a bit after 200,000 pages. The page count can be determined from a configuration page, by looking at the printer's internal Web server or from SNMP statistics fed to a Print Management system. Preventative maintenance will avoid down-time and stress. After 225,000 pages the printer will prompt with the message PERFORM PRINTER MAINTENANCE
on the control panel. This message can be suspended for 10,000 pages by using "CLEAR MAINTENANCE MESSAGE" on the "RESETS" submenu. (You can also change the maintenance interval).

Changing the fuser before or at the prompt won't get the best life from the parts as they will likely be disposed of in a working condition. Alternatively the kits can be treated as a repair and the parts held back until a specific need arises. Of course, if the fuser fails there is likely to be down-time unless users are confident about fitting a new kit. IT technicians usually are confident and with a bit of experience the kit in these machines can be changed less than ten minutes. Users don't often get asked for a maintenance kit so they may be less happy.
Given how little trouble examining the fuser in one of these printers is a half-way house might be to check fusers and rollers for wear when they reach a page-count and only make the change if signs of wear seem to warrant it. That might significantly reduce the budget for kits at the risk that some printers will fail unexpectedly. The thing to look for with rollers is lack of texture and look in the error log for misfeeds. The fuser probably won't have given any loggable faults but look for edgewear
, scouring on the fuser sleeve and buildup on the surface generally.
We have a new section on installing a maintenance kit here. For the M601 and M604 printers HP are now quite clear that the kits are user-installable. The P4014 series are similar and experience suggests users rarely have much trouble.
A word of caution though; tempting as it is to save money, users with little experience of printer innards should steer clear of refurbished kits. There may not be instructions and problems leading to an RMA are more common.
Kit Installation
The parts of the printer innards that are generally considered user-changeable are marked by being coloured blue. The blue latches on the fuser and the rollers and the cog on the transfer roller are intended to draw attention.
The HP kits comes with instructions. Others may not.
Fitting maintenance kits is considered a user rather than an engineering matter so it won't normally be covered under a service contract. Interpretation of this might well differ by site. Places with their own technicians will probably have IT do the job; however there isn't anything terribly technical about it. Warranty on parts generally is 90 days. HP kits seem to carry varying warranties. An HP entry in Icecat says this in July 2013:
Elsewhere distributors say HP parts carry a warranty of 180 days however this varies with the region worldwide. If an HP kit fails prematurely we have generally found HP and distributors sympathetic and helpful. (which can't be said of all manufacturers)


Turn the printer off and remove the power cable. Remove the cartridge particularly if you intend to inspect and clean the printer innards, which is advised. Keep the cartridge in a dark space whilst it is out of the printer. Remove the duplexer from the rear if one is installed, lift it and it pulls out.
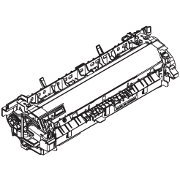
Fuser Installation
Open and then remove the rear door which doubles as a face-up tray. Push the tray leftwards firmly but not excessively and the boss on the right arm will disengage from that side of the printer. The left side will then lift free.
The fuser can now be seen. It is held in place by two blue latches, one at either side. Lift the latches and they disengage. The fuser will now pull out from the rear of the printer, it may need rocking back and forth a little because of the large electrical connector on the underside.
A new fuser can be pushed home; the latches should click into place audibly on either side. Ensure the latches do engage as a badly installed fuser can damage the printer drive gears.
With the fuser out is often a good time to examine and clean the printer more generally; light gets into positions that aren't usually so visible. If you intend to examine and clean the printer generally then having checked how the new fuser fits remove it once more and proceed with the rest of the job.
Otherwise, put the door back in place and any duplexer - but we do advise cleaning the printer.
Roller Installation
Each tray in the printer uses pickup, feed an separation rollers. The maintenance kit does not at present seem to include rollers for the MP tray, some sites never use it. There are several sets of rollers for cassettes. It also seems the kits do not currently include RM1-0036 pickup rollers, just the RM1-0037 feed and separation rollers.

The built in cassette tray has a separation roller at its front. Changing it gives a good indication of how the other rollers are changed.Remove the cassette tray entirely from the drawer housing. The roller is visible at the edge of the paper well. To remove it open the sprung flap. The roller is clipped to it's shaft, squeeze the clip with a finger-tip and the roller simply slides of the shaft. Leave the black torque-limiter in place. A new roller just slides onto the shaft and clicks into place.

The matching roller is in the front of the cassette draw space in a position to match that in the cassette. There are two rollers. That at the back on the white plastic core is the pickup roller and may not need changing. (The core is white because it isn't particularly regarded as changeable). The roller at the front with the blue plastic core is the feed roller. The feed roller simply unclips in the same way as that in the cassette, it is just at a less convenient angle.
Several sets of feed/separation rollers come in the kits (at present). These are for additional 500 sheet cassette trays and are installed in the same way. If you don't have additional trays then you will not have to buy roller replacements between maintenance kits.

Transfer Roller Installation
The transfer roller is under the cartridge position. Remove the cartridge if it is not out already. The transfer roller has a blue cog, suggesting it is removable. Use the blue transfer roller hook to lift it up, leftwards and out of the printer. If there is no hook grip the metal roller stem lightly with needle-nose pliers or just lift it at the cog end with a small screwdriver and then with fingers..
The transfer roller often has some toner deposit underneath it, if this seems excessive remove it with a damp but not wet cloth and then let the area dry out. If this is a job you do a lot, get a toner-rated vacuum cleaner.
The new transfer roller slots into place where the other was removed. The right side goes into position in its bearing first. Note that the cog end of the roller has clips that point down as it is removed and make sure they are in the same position. When the left side goes down the roller should gently clip into place.

Avoid touching the black surface of the roller itself. The roller comes in an orange wrap so keep it wrapped until it is about to go in place. Grease from finger is capable of de-naturing the electrically conductive material the roller is made of. The blue cog capping the metal shaft will pull off if you aren't careful, just put it back.
If the printer has been cleaned then fuser, back door, cassette and cartridge all go back in place. Plug the machine back into the power but leave the network disconnected for now. Try to print a configuration page (or any other test page). If you immediately get a misfeed something is not seated properly - one of the rollers didn't latch onto its shaft perhaps.
Maintenance Reset
It will be helpful to record that the maintenance kit was fitted and performing the maintenance reset will clear the annoying message.
The standard way to give the maintenance reset is as follows:
- Turn the printer power off, wait a moment and then on again. When NnN MB appears on the control-panel display as the printer does it's start-up memory check; press and hold down the OK button until ...
- .. All three control-panel lights flash once, and then stay on. This takes a few seconds - possibly up to ten seconds.
- Release the OK button. The menu that appears is the Startup Service Menu.
- Press the up or down arrow to scroll to NEW MAINTENANCE KIT.
- Press OK to reset the maintenance-kit counter.
Older printers may have old firmware. There are various reasons to upgrade the firmware (and some to avoid it). These require the service PIN to get to the reset.
- Press Menu
- Use the up/down arrows to highlight SERVICE, and then press OK.
- The printer will request a PIN they are
- P4014 is 05401408
- P4015 is 05401508
- P4515 is 05451508
- Adjust the maintenance count to show zero
With new parts installed, cleaned and the maintenance kit installed the printer is good for another 200,000 or more pages.
HP say:
Perform this procedure only after a maintenance kit has been installed. Do not use this procedure to temporarily clear the PERFORM PRINTER MAINTENANCE message.
HP Information
As already mentioned the maintenance kit comes in 110 volt and 220 volt versions.
- CB388A is also known as CB388-67901 The fuser is RM1-4554 or RM1-4554-000CN and more recently CB506-67901. They are 110 Volt for the US, Canada and Japan.
- CB389A is also known as CB389-67901. The fuser is RM1-4579 or RM1-4579-000CN and also CB506-67902 They are 220 Volt for the UK, EU and rest of the World.
There are some rare cases where US 110 volt fusers are wanted in the UK or European 220 volt fusers are wanted in the US. We don't normally offer them in the catalog but can obtain them in principle.
HP seem to have intended to call the maintenance kits by the short code-names but then some accident or decision made them use the longer codes.
HP Partsurfer doesn't respond to the short codes CB388A
CB388-67901
Replacement 110v Maintenance Kit
Part CB388-67901 is no longer supplied. Please order the replacement, CB388-67903
CB389-67901
Replacement 220v Maintenance Kit
Part CB389-67901 is no longer supplied. Please order the replacement, CB389-67903
Codes beginning "CB" and having this general form seem to be HP originated, and so does the replacement code for the fusers. Likewise the main roller in the kits RM1-0037 has the replacement code Q7829-67925 suggesting HP have direct control of production.
Icecat didn't respond to a query on CB388A, however it does for CB389A.
CB389A is 0883585279999 5704327466628 5704327655008
- Icecat also suggests B389A as a code but that was probably just a miskeying
Web Research
Laser printer maintenance kits inherently come in two varieties to match the power supply of the region they are sold in, so we expect two quite different sets of vendors. Also there are several possible codes.
Google responded to CB388A
with About 114,000 results (0.21 seconds)
h10010.www1.hp.com $319.00, h30094.www3.$319.00, www8.hp.com/uk/en £309, amazon.com$211.73 free shipping with prime, amazon.com (USAprinterguy) $265.49, amazon.com (AccutekImaging) $175.14, cdw.com $259.99, laseronline.net $310.70, newegg.com $411.99, printertechs.com $199.0 with fuser exchange $259.00 without, myinkpro.com $271.29, itpartsglobal (refrb) $159.00, fastprinters.com exchange $237.55 without $330.20, shopbot.ca Price Range: $300.00 to $495.00 at 18 stores, costco.com $359.99, staples.com no longer available, precisionroller.com $309.95, printersupplies.com $339.00, printerworks.com exchange 189.00 without 299.00, tonernmore.com $313.00
Incidentally whilst there was universal agreement that you get a fuser, transfer roller and some RM1-0037 rollers in the box together with gloves and the transfer roller hook. A lot of sites show a "D" shaped roller with would be an MP pickup roller - except the printer doesn't have one.
Google responded to CB388-67901
with About 3,000 results (0.25 seconds)
- a lot fewer responses for what superficially looks like the more used code.
fastprinters.com exchange $237.55 without $330.20, impactcomputers.com regular $292.74 sale $239.95, precisionroller.com list price $319.00 sale $309.95, amazon.com (AccutekImaging) $281.46 $4.49, ebay.com (a-zcomputingwi refurb) $205.00 +$10 shipping, partshere.com $420.97, partsnow.com login for price, partsnow.com again, tonermadeinusa.com $244.59, sparepartswarehouse.com $384.04, ebay.co.uk (bumpski25 refurb ) US $135.00 £88.06, worldclassink.com $314.99, sears.com GBP 216.54, oeonline.ca no price, printscancopyfax.com refurb $195.00, alibaba.com ad, renewcomputer.com refurb $175.00, cdw.com $264.99, tonermax.com $283.9.
Prices noted are for a new item without tax. The list is as encountered. We haven't bothered with currency conversion - half of our readers are outside the UK and are more interested in dollar prices.
On the whole we have found US sites like precisionroller, partsnow, printerworks and printertechs to be much more informative than British sites. This part code is US only. Disappointingly the sites that we know do have information looked just like the list driven sites - although there was no evidence that they were actually cheaper.
Supply Situation
Maintenance kits for laser printers are quite expensive at around $250 although arguably that is just over $0.01 per page. The price is certainly something that make the finance department ask IT "wouldn't a new printer be cheaper" (the answer is no, the running cost of these printers is amongst the industry lowest).
The cost attracts several kind of compatible manufacturer as well. The price of HP kits tends to be a little higher than buying the parts (its a single purchase and you do get instructions) so some distributors make up their own "brown box" kits from what they say are HP original parts - they are a little cheaper. The kit may or may not come with instructions - although given what is outlined above you probably don't need them.
In July 2013 these parts are available new and refurbished. The refurb kit will have a refurbished fuser with new rollers. Our feelings on refurbished fusers is that they suit experienced technicians and maintenance companies trying to keep costs down but they may not prove so reliable. We tend to offer them at a substantially lower price although we note that the price research above showed others didn't always reflect that - or make the fact that something was refurbished clear.
The relatively high price has also attracted at least one compatible manufacturer. Nupro a Singapore based company that often challenge the larger printer manufacturers on the price of parts. These kinds of parts are also sometimes called "Generic".
All of these options are available for the CB389A 220 Volt fuser in the UK. No UK distributor shows the US CB388A and experience suggests they will be reluctant to get it, it will have to be imported. We think demand for the part is quite low but if you really must have 110 Volt CB388A we should be able to source it.
Our price for CB389A was about £221 in 2013 but HP seems to drop prices on the older printer kits, presumably as they see refurbs taking part of the market. Prices for CB388A may be a bit higher in the UK, this largely reflects the logistics of obtaining one though distributors.
These are guidelines, our prices change with distribution lists - see the catalog. Stock numbers indicate there is rare UK demand for the US part.
Copyright G & J Huskinson & MindMachine Associates Ltd 2013, 2015. Some pictures derived from HP User and Service guides. These technical pages do not constitute an offer for sale; just our knowledge at the time of writing. See the catalogue. Sales pages on this Web site use cookies to store user information. We also use Google Analytics to track site usage patterns.