
HP Laserjet 1010

Laser printers primarily for individual and home office use. The printer has a space-saving small footprint.
The 1010, 1012 and 1015 are similar but the higher model numbers have a slightly better specification. The 1015 has a parallel port, input tray cover, more memory, PCL 5e, network and Linux / Unix capabilities.
- HP LaserJet 1010 - Q2460A - 12ppm mono printer.
- HP LaserJet 1012 - Q2461A - faster at 14ppm.
- HP LaserJet 1015 - Q2462A - faster and with PCL 5e language and 16MB RAM
The LJ1018 is part of the same family but uses a different fuser. Likewise the 1020 and 1022.
All models feature:
- 8 seconds to first page out.
- 600 x 600 dpi.
- A priority input tray.
- A horizontal paper feed path.
- 8 MB of RAM (not expandable).
- A host-based driver.
The Canon LBP-2900, LBP-2900B and LBP-3000 are very similar mechanically. The space saving format is achieved by turning a more conventional "U" shaped feed path on its side to give a "C" shaped path . For a cross sectional diagram of the printer innards see the troubleshooting section below.
Control:

3 Status LEDs and buttons for "Go" and "Cancel" Otherwise all support is via a print driver. The two visible buttons actually press the same switch - the printer reacts differently depending on context.
If all the lights are lit at once the printer is in an error state, see below.
There is a self-test mode, cold reset and MVMEM initialisation.
Duty Cycle:
Up to 5,000 pages per month
Print Speed:
12 pages per minute - Print speed will be system dependent because the LJ 1010 and 1012 are "winprinters" using a nearby PC to format the page.
Print Resolution:
600x600 dpi
Paper Handling:
A4 with a 150 sheet main tray and a 10 sheet priority feed.
Priority Feed and Tray 1:Minimum Size 76 x127 mm (3 x 5 inches). Maximum Size 216 x 356 mm (8.5 x 14 inches). Paper weight up to 163 g/m2.
Main Tray:150 Sheets
Paper output capacity:125 sheets
Memory:
8MB RAM
Interface:
USB,There is no network support on the 1010.
System Compatibility:
Microsoft Windows. The LJ1015 supports Linux.
Power:
110 to 127VAC or 220 to 240VAC.
Power Consumption:
Off, 0 Watts. Powersave 7 Watts. Printing 214 Watts.
Dimensions:
370 x 230 x 208 mm
Weight:
7.41kg
Consumables:
All in one cartridge containing the toner, developer and drum.
Q2612A - HP Black Toner Cartridge, Standard yield 2,000 pages - Q2612A
SI5008A - Silver Reed Black Toner Cartridge - SI5008A
Fuser:
Fusers adhere toner powder (or "ink") to the page using a combination of heat and pressure. The fuser working surface is a non-stick material which eventually wears out, especially given the combination of heat and pressure.
Fuser failures can be sudden - bits of material emerge from the printer when the fuser sleeve degenerates and pages then jam or the toner doesn't stick to them. Fuser heaters fail and then the machine won't start up.
On large printers fuser problems are shown by "Error 50" on the LCD display. On these models there are only lights. If the printer goes to "all lights on" when powered up then there is a hardware error. Try cycling the power leaving the printer off for a couple of minutes. If the fault persists the hardware error seems to be confirmed. Press the Go button and the printer will display a secondary pattern.
If the secondary pattern is:
- Go and ready: the fuser has failed and needs replacing
- Attention light: the formatter and engine control board are not communicating. Probably the ECU has failed (see below).
RM1-0661 - Fuser 200/240V for the LJ1010 1012 and 1015 - RM1-0661-040CN (has been known as RM1-0661-000CN. The service manual gives the code RG9-1494-030CN which is incorrect (that is for the LJ 1000/1200/3300 which is similar. The service diagrams suggest RM1-0656 but that code is unused/obsolete.
RM1-0661 is usually available as a refurbished part, meaning the unit has been cleaned, the foil sleeve replaced and it tests as good. They have the same 90 day warranty as manufacturers originals.
RM1-0660 - The 110V fuser code (was RM1-0650 according the service manual).
Replacing the fuser is a fairly expensive exercise in a low cost printer. About 90% of the time the fault with fusers in these machines is that the foil sleeve has failed. One way to save money is to replace the sleeve.
The fuser in the LJ 1010/1012/1015 has an expected life of 50,000 pages. This is a short life but it's a small printer. The fuser in the LJ 1018 is RM1-2050 which is similar but not identical.
Replacing the Fuser:
As often happens with small printers the fuser is not particularly easy to change. It is at the upper rear of the printer.
Remove the cartridge.
Remove the right side cover. There is one screw on the back near the USB port and a plastic locating tab about midway along the printer base. There are two locating tabs on the front so open the cover from the rear.
Remove the left side cover is similar to removing the right side.
Remove the print cartridge access door, which has screws on the inside at either side. Needle nose pliers will be needed to release the plastic door link clip from the hinge arm. Don't lose the door link clip.
Remove the fuser cover and the rear panel.
Disconnect cables from the top of the engine power assembly and the large grounding cable. Undo the plugs and ease the various wires from their routes in the chassis.
Remove two screws from the left and one from the right of the fuser.
Lift the right end of the fuser assembly and it should free up from its cogs and lift out rightwards.
The delivery sensor PCB from the old fuser needs transferring to a new one.
On the left of the fuser assembly there is a plastic tab which fits into the sheet metal of the base, slot this in as you lower the right side of the new fuser into place. Put the new fuser wires in their routes and replace the connections.
Reverse all the cover removal actions.
Full information is in the Service Manual.
Cleaning:
The fuser and other parts of the printer can be cured of dirty print by running a cleaning page. The process ideally requires a page of transparency of a grade appropriate to the printer. If no transparency is available much the same effect can be achieved by running the cleaning process 3 times using photocopier paper. With appropriate media in the tray start the cleaning process by holding "Go" for about 12 seconds. The process takes about 2 minutes.
If the automatic cleaning process doesn't seem to work then hand cleaning may be needed. Us a dry lint free cloth. Vacuum cleaners that have a filter that traps particles as small as 1 micron might also be used. In cases where toner contamination is bad technicians often use an air duster or pressure hose outdoors.
TroubleShooting:
As the diagram shows the main components of the printer - toner, developer and drum - are all inside the toner cartridge. It is sometimes said that 70% of faults are fixed by changing the cartridge.
If paper fails to pickup or if paper jams with several sheets in the machine before the cartridge suspect the Pickup roller and Separation pad first - it is normal to change them at the same time. There are brief instructions below.
If paper concertinas just before the fuser then the fuser foil has failed. The printer might not detect this so there may not be any error showing in the lights.
Smudges and streaks in print are usually caused by the fuser as well. Use the cleaning procedure above. If the cartridge is recycled or not manufacturers original there may be an issue with the toner used.
Marks vertically down a page are usually caused by damage to a roller and the pitch of the marks suggests which roller is involved.
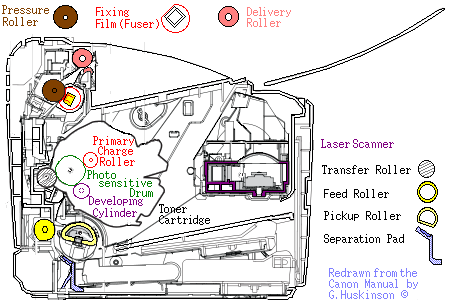
- 55mm 2.2 inches - Feed roller
- 46mm 1.8 inches - Transfer roller
- 38mm 1.5 inches - Primary charge roller
- 76mm 3.0 inches - Photosensitive Drum (OPC)
- 31mm 1.2 inches - Developing cylinder
Canon says
- 57mm 2.2 inches - Fuser fixing film
- 56mm Fuser pressure roller
HP says
- Fuser (Fixing assembly) 41.0 mm 1.61 inches
- Fuser (Fixing assembly) 56.5 mm 2.22 inches
Spares:
The LJ1010 series printers and similar competitors achieve their low prices by being lightly built. Nevertheless they will be repairable whilst there are parts. From 2008 on HP have been phasing out parts. In 2010 HP do still seem to have pads and rollers available but they were not present in stock in UK distribution so there might be a lead time. Fusers were available.

RM1-0629 - Paper Pickup Tray Assembly at the bottom front of the printer.
RM1-0659 - Delivery Tray Assembly for the paper to land on at the top front of the printer
RM1-0641 - Paper Pick-up Assembly, full pickup and transfer assembly - RM1-0641-000CN
RM1-0648 - Separation Pad Assembly, bottom rear of the printer - RM1-0648
RL1-0266 - Paper Pickup Roller - RL1-0266-000CN. See below.
RM1-0658 - Transfer Roller Assy, the long foam roller in the middle rear of the printer - RM1-0658-000CN. See below.
RM1-0171 - Laser Scanner, in the base of the printer - RM1-0171-000CN
RM1-0808 - Engine and Power Supply Assy - RM1-0808-040CN
RM1-0806 - Engine Controller Assembly - RM1-0806-050CN
Changing the pickup roller and pad.
Release the small, white tabs on each side of the pickup roller by pushing them away from the roller, and then rotate the pickup roller toward the front. Pull the pickup roller up and out.
The roller can be cleaned with water and a damp cloth. It should have a textured surface but if this has worn away it will need replacing. Rollers have a life of around 50,000 pages. A replacement roller snaps into place.
If the printer pulls more than one page into the machine at a time the separation pad needs replacing (they have the same design life as the roller and it is normal to buy them at the same time).
The separation pad is at the back of the printer held by two screws. Remove the screws and the pad pulls out. Full information is in the Service Manual.
Transfer Roller:
Transfer rollers do not give a great deal of trouble unless they are handled and this one is a bit difficult to remove, so unless it is highly suspect of causing a fault leave it alone.
To remove it: Remove the print cartridge and locate the transfer roller.
Release the tabs on the paper guide and rotate it up. Clamps on the paper guide fit over the transfer roller bearings. Pull the right end of the paper guide off the right bearing. Slide the guide slightly rightwards and it will come away from the left bearing.
Squeeze the two small tabs at the right of the transfer roller then hold the gear on the right and slide it rightwards. The roller and guide should lift out of the printer.
Note that there is a contact spring under the right bearing of the roller and it must be correctly positioned when the roller is replaced.
Test and Maintenance Functions:
When the printer is in the "ready" state pressing the button for:
- up to 4 seconds, Demo page.
- 5 to 9 seconds, Configuration report.
- more than 10 seconds, Cleaning page. Cleans the fuser.
Although the printer has just the two visible buttons it has a range of tests.
These are all activated by turning on the power with the button pressed and what they do depends on how long the button is pressed. So 10-20 seconds performs a cold reset.
Seconds ... Function .... Lights ... Actions
- 10 -20, Cold reset, Attention lit, lights then cycle front to back then the printer goes to Ready.
- 20 -30, Continuous self-test, Attention and Ready lit, Ready blinks. To terminate the self-test press "Go" again.
- 30 -40, NVMEME initialization, Attention, Ready and Go lit, lights cycle front to back then the printer goes to Ready.
- 40 -50, Error report, Ready and Go on, Error report shows the most recent error.
- 50 , NVMEME super initialization, Ready comes on. After releasing Go all the lights blink in unison for 3 seconds. Press and hold Go again, all the lights turn off. In the next 3 seconds the lights turn on one at a time, when they are all lit, release Go. Initialisation will run and the printer will go to the Ready state.
Copyright G Huskinson & MindMachine Associates Ltd 2012