
HP Laserjet 4200 and 4300 Series Grinding Noises
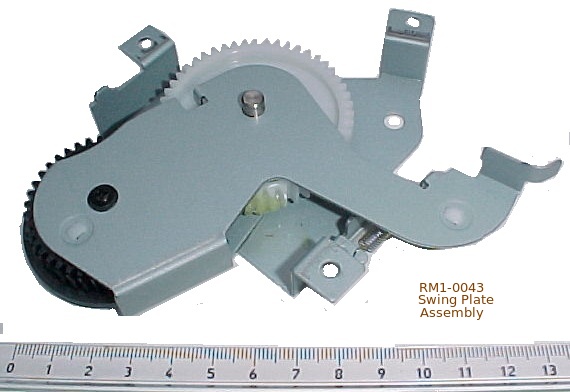 The HP LaserJet 4200 and 4300 printers are generally very reliable. They do have a well known problem with a fuser drive gear on what is called the swing plate assembly. A symptom of the problem is that printer makes grinding noises. If users can stop printing when they begin to hear the noise then replacing the cog is a fairly quick procedure. Otherwise the printer will have to be partly stripped and rebuilt to replace the whole swing-plate assembly and that is not so quick. HP redesigned the part and replaced many of them under warranty but the problem has never been entirely eliminated.
The swing plate assembly moves back and forth when the print cartridge lid is raised and lowered. Opening the lid moves the swing-plate so that it no longer engages with the cream coloured 40 tooth fuser cog. This allows the fuser to rotate more freely and allows users to pull paper jams out of the fuser without the load of the motor cog chain.
Suggested Causes are:
- The fuser not seating correctly. Possibly the blue fuser retaining clips don't grip as well as they should. On replacing the fuser make sure it pushes fully and firmly home. If the printer has been moved also check that the fuser is fully pushed home. The swing-plate problem might be a downside of HP making the fuser so easy to swap.
- If the clips don't engage properly then the fuser won't turn at all and the printer will go to paper jam when it reaches it - there is no way through. Some engineers collect the blue clips when they replace old fusers as good clips can come in handy for future jobs.
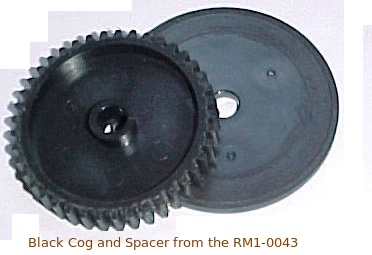
- Gear seating is definitely an issue. The black gear has some freedom of movement. New swing plates include a spacer that limits the gear's ability to drift to one side. It appears that this reduces but doesn't utterly eliminate the fault.
- Another possibility is failure of the spring on the swing plate assembly. When the gear is lifted there should be resistance from the spring.
- Another possibililty is that the linkage that connects the swing plate and the lid doesn't always push the plate as firmly as needed so that the lid closes and makes the safety cutout allowing the printer to work when the swing plate isn't firmly pushed onto the fuser cog.
Examining the Cog:
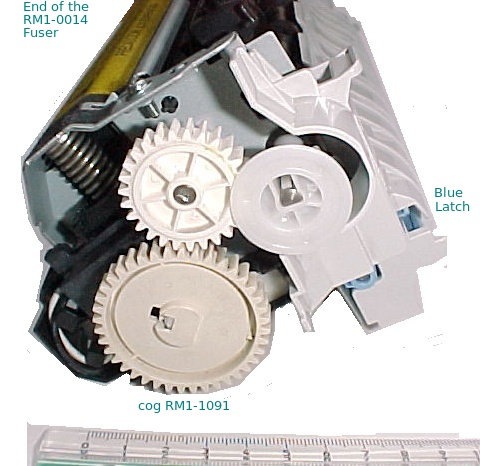
 The swing plate assembly is fairly deep inside the printer behind the fuser. Part of it is visible with the fuser removed - its the big grey-black cog visible on the left. Problems with the cog often self diagnose - with the fuser out some black dust from the grinding of the cog is visible on the metalwork beneath it.
Grinding of the black gear will ultimately destroy the gears on either side of it. If that has happened then the entire swing plate will need to be replaced and so might the cream coloured cog clipped onto the fuser pressure roller drive shaft.
If the problem is caught early then it might be possible to just swap the black cog and the spacer. This is an easier job as all that needs to be removed is the fuser and the formatter. The screw that holds the black cog in place is visible under the formatter - when it is removed the shaft that holds the cog drops out - catch it before it rolls somewhere inconvenient like into the PSU.
Replacing the cog is a bit fiddly - tweezers to hold the shaft in place might help.
If the problem has existed for a while the white gear behind and below the black gear will have to be replaced as well so that means swapping the whole of the swing plate assembly.
Choice of Parts
In bad cases damage will also have spread to the gear on the fuser. The part number seems to vary with the fuser number but it's often called RM1-1091. This is easy to change, its just latched onto the end of the drive rod. HP have switched from supplying the swing plate alone to supplying a kit with both the swing plate and this cog, perhaps because they feel replacing all the cogs is more satisfactory (or perhaps because kits are more expensive).
The fault is so common that other manufacturers have produced "compatible" swing plates, often claiming that their own version is better engineered than HP's. It's a matter of judgement as to whether the compatibles will prove equal to the HP kit. Which approach you choose probably depends on whether you have a lot of these printers on contract (making kits expensive) or whether these are your own printers so the nuisance of fitting the kit is more important than the cost.
Changing the Cog
 The swing plate would be easy to change - if it weren't for all the other bits that have to be removed to get at it. All the covers have to come off and the power supply removed to get at the swing plate assembly properly.
Remove the toner cartridge.
Remove the rear face-up tray which is held in place by locating pins on either side, gentle pressure dislodges them.
Remove the fuser by pressing on the blue latches.
At this point the cogs are visible. If the black cog is the only one damaged then you may get away with removing the formatter as suggested above. However if the white cog behind it and / or the fuser cog are damaged then the problem will not be cleared by the simple fix. The other cogs will damage the replacement
First decide whether to go for: RM1-0043 - the swing plate assembly alone or 5851-2766 which contains the RM1-0043 and a fuser cog RM1-1091.
Here is the replacement procedure
Replacement Procedure
Unscrew the screws securing the top cover and remove it, unplug the control panel cable from the Engine Controller.
Remove the left cover, it is secured by clips along the front edge.
Remove the right cover
Remove the formatter enclosure - it is held by two screws at the rear and then slides out. (Actually it sometimes slides out with considerable difficulty)
Remove the right tray guide, its held by two screws.
Remove the switch rod
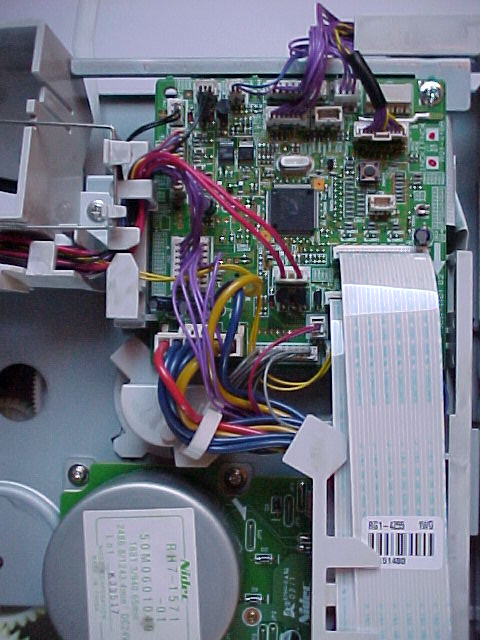 Remove the cables on the lower part of the Engine Controller including the ribbon cables
The power supply is the "shelf" that the fuser sits on. On the right side of the printer remove four screws in the mid-rear that hold the power supply.
On the other side remove the screws holding the connector access cover and remove the connector in there. Remove the screws securing the power supply.
The power supply and the belt drive on top of it can be lifted a bit and pulled out.
The power supply plastic support guide can next be removed.
The toner cartridge guide is the plastic block held onto the frame with a spring
At this point the three screws securing the swing plate assembly are visible and it can be replaced.
Reverse the sequence above and put it all back together.
Some References
HP have a service note covering the issue - C00596092. It can be found using a search engine.
Article by Matt Barnum in Parts Now "Service Today" January 2005 "The HP JaserJet 4200/4300 Series Swing Plate Assembly: Playing Hard to Get".
Copyright G Huskinson & MindMachine Associates Ltd 2012