
HP Original Toners
Fuser
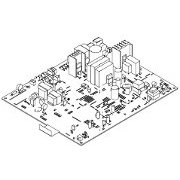
Spares


HP LaserJet P2015 (CB366A).
A4 laser printer series with black and white print. HP say it is intended for "small workteams and privileged professionals". It's a compact and fairly fast device which gives lasting laser-print and has sufficient print resolution to cope with graphics and photographs. The 250 sheet tray capacity is large for a printer this size and allows it to run unattended. There is an optional extra tray which is useful where lots of letterhead is required - or just to provide extra paper capacity.
There are several models in the P2015 family. The P2014 is a low-cost version of the same machine best suited to individual use.
- P2014 - CB450A - 23 ppm 1200dpi, 2 Trays + optional 3rd, 32MB RAM not expandable. Although its print control is Host-Based it has support in most operating systems.
The P2015 series is slightly faster and has a duplex option. Additionally it has a better processor, the memory can be expanded and it handles PCL 6 and PostScript. The P2015 can handle complicated print jobs from any system.
- P2015 - CB366A - 27ppm, 1200dpi, 2 Trays + option for 3rd, 32MB RAM expandable to 288MB.
- P2015D - CB367A - As above with an automatic duplex unit giving 2-sided print.
- P2015DN - CB368A -As for the P2015D with an embedded JetDirect Ethernet print server.
- P2015X - CB369A - All the options. Duplex, Network and an extra 500 sheet tray.
- P2015N - CB449A - is the basic printer but includes an Ethernet print server.

There is also the M2727N MFP which is the multifunction version of the P2015 with scanner, copier and fax capabilities.
The LaserJet P2014 and P2015 were launched in December 2006. They are successors to the popular LaserJet 1160 and 1320.
- P2014 is roughly the LJ 1160 - a reliable printer for personal use - P2015 is equivalent to the LJ 1320 - a printer series with full features for general use.
The printer achieves its small footprint using an "S" shaped paper path with the paper cassette sliding into the bottom of the printer body.
The S shaped path would limit the maximum paper thickness that can be used but there is a straight through path from the fold-down multipurpose flap at the front of the printer to a fold-down face-up flap on the rear - this does mean the printer needs more space to operate but the flaps can be closed when they aren't in use.
Maintenance is ordinarily easy - there is a single cartridge which changes the majority of the parts likely to fail.
There are two different sized cartridges - a 3,000 page version and a 7,000 page extra life version for printers that are heavily used.
The rollers are also easily changed, they clip into place and the pads are held by clips or screws.
There is a problem with the fuser - it can only be changed by someone with technical skills - or a good memory for screw and connector positions and a certain amount of patience - see the Fuser section below.
Control:

6 Lights: Jam, Toner Low, Paper Out, Attention, Ready and Go.
Buttons: Go and Cancel.
Network models have HP Embedded Web Server. HP Web JetAdmin, HP Toolbox.
| Jam | Paper Jam (Error 40022) | |
| Toner | Constant -Toner low. Flashing - Toner missing | |
| Paper | Paper Out (Error 41900). Go steady and Paper flashing - Wrong paper. | |
| Attention | When flashing: 4100 - waiting for manual feed or some other continuable error. Press "Go" to continue. OR 40021 - the print cartridge door is open. Attention and others -error. | |
| Ready | Lit when the printer is waiting. Flashing when processing data | |
| Go | ||
| Cancel | Stop a print job |
Go, Ready and Attention flash in sequence during Initialization and reconfiguration.
Attention, Go and Ready all on - Fatal Error - try turning off, waiting 5 minutes then turning back on. Errors 50003, 50005, 50006, 50007
Attention, Go and Ready all flashing - Accessory Error - Press "Go" to get the secondary error.
Secondary Messages
Attention, Go and Ready all steady - Fatal Error
Attention flashing - Engine error - the formatter and engine controller are not communicating. (error 55 or 50007) Or Fan motor
Ready steady - Laser error.
Go and Ready Flashing - Fuser error. Check connections and resistances. (50XXX error)
Accessory Secondary Messages
Go - DIMM error - check the DIMM seating, otherwise relplace the DIMM. Error 53xxxx or 79xxx
Duty Cycle:
15,000 pages per month on the HP madly optimistic scale. Recommended monthly page volume 740 to 3,000 pages
Copier Version:

The M2727N MFP is a multifunction copier version of the same print engine.
Speed:
The LaserJet P2015 has throughput up to 27 pages per minute. The P2014 is host-based and will be somewhat dependent on system speed.
Resolution:
True 1200x1200 dpi with HP FastRes 1200
Paper Handling:
A4 Printer with one multifunction and one 250 sheet tray as standard and an extra 500 sheet tray as an option.
Print margins 4mm all round.
Tray 1:
Fold-down multifunction tray with a capacity of 50 sheets (unusual on a small printer). Media sizes A4, A5, A6, 76x127 to 216x356mm. Weights 60 up to 163 gsm via the straight through paper path.
Tray 2:

250 sheet tray for standard paper sizes that slides under the print engine. Paper sizes A4 and A5, 147x211 to 211x356 mm. Paper weights 60 to 105 gsm to the standard face-down output bin. The spare cassette is RM1-4251.
Optional Tray 3:
500 sheet tray. Paper size and weight as for Tray 2.
Q5931A HP 250 sheet accessory tray (installs under printer). Laserjet P2014, P2015 and LJ1320 - Q5931-67001
Output:
Up to 125 sheets to the face-down bin on top of the printer.
Output:
There is also a fold-down straight through path at the rear of the printer for envelopes and card.
Duplex:
An auto duplex unit is installed on the P2015D, P2015DN and P2015X. Other models have support for manual duplexing in the drivers. Auto-duplex is much more convenient as it means the printer can do the job without manual intervention.
Processor:
Motorola ColdFire V5 running at 400MHz
Memory:
32 MB expandable to 288MB using one open 144-pin DIMM slot.
Interface:
USB 2.0 Hi-Speed.
Network:
"N" and "X" models have an embedded JetDirect print server as well.
Print Languages:
P2015 - HP PCL 5e, HP PCL 6, HP PostScript Level 3 emulation. (But the P2014 is just host based)
The P2015 PostScript emulation is a selling point - it allows these printers to work with a wide variety of systems and to be used for some graphics design tasks
System Support:
Microsoft Windows 98 Se, 2000, Me, XP, Server 2003.
Apple Mac OS v 10.2.8 and higher.
Unix, Linux, HP Open VMS and Solaris.
Environment:
Economode saves up to 50% of toner depending on print mode.
Power:
Input voltages 110 to 127 VAC or 220 to 240VAC
Power Consumption:
Off, 0.1 watts. Ready-sleep, 7 watts. Printing, 350 watts.
Dimensions:
Basic Unit: WDH 350x362x256mm.
Weight:
11kg.
Consumables:

Print cartridges are available in two versions: with 3,000 capacity suiting a printer intended for occasional use and a 7,000 page type suiting a busy office printer.
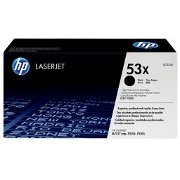
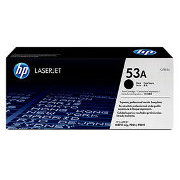
(*)Q7553A HP Black cartridge with smart print. Yield 3,000 pages at 5% cover - Q7553A ![]()
(*)Q7553X HP Black cartridge with smart print. Yield 7,000 pages at 5% cover - Q7553X ![]()
The cartridges are one-part types with toner, developer and drum all in one easy to change unit. This makes fault identification and fixing easy - most of the parts likely to cause a print problem are swapped when the cartridge is changed.
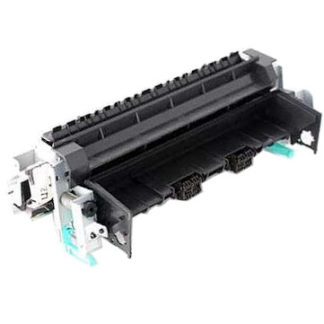
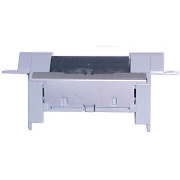
Fuser Unit:
The fuser in a laser printer is responsible for sticking the toner powder to the page. The printer will often detect and report a fault with the fuser - the symbol is the roller with crumpled paper at the top of the control panel. Signs of a non detected fault are streaky print with parts not properly adhering to the page. If the page has dirty margins that suggests fuser edge-wear and is a sign that it is coming to the end of it's life.
RM1-4247 Fuser 220 Volt for M2727MFP, P2014. P2015 - RM1-4247-020CN
(*)RM1-4248 Fuser 220 Volt for M2727MFP, P2014. P2015 - RM1-4248-020CN ![]()
Replacing the HP P2014 / P2015 / M2727MFP fuser is not the easy job expected with most recent printers. All the covers have to be removed, so does the fan, the duplex or face-down gear, several other gears and the formatter. This problem was present in the earlier 1160/1320 design that the P2015 is based on.
The most likely faults with the fuser are:
Degeneration of the fuser film - normally this is evident because bits emerge at the top or are visible when the back flap is opened.
Failure of the fuser heater. People with electronic experience and a resistance meter can measure it. According to the service manual Mormal resistance is 80 Ohms +/- 20 Ohms for a 220 Volt Printer and 25 Ohms +/- 10 Ohms for a 110 Volt Printer.
The thermistor could fail. Its resistance is 370K ohms +/- 50 K Ohms at 20 Centigrade.
Full instructions for replacing the fuser are given in the service manual.
Very Briefly:
- Remove all the covers.
- Disconnect the fan cable and remove the fan
- Remove the Duplex Gear assembly if the machine has duplex fitted. Or the face down gears if not. Gears are not attached to the plate, don't let them fall off.
- Disconnect the duplex solenoid cable from the duplex PCB. Unscrew the duplex solenoid
- Remove the formatter
- On the right hand side where the gear assembly was remove the duplex gear and the fuser gear - they have little locking tabs holding them to the shaft.
- Disconnect all the cables from the fuser to the control unit.
- Remove the two cable holders at either side of the electronics - they slide off.
- Remove the screw from the fuser cover. Slide the fuser cover to the right and remove it.
- Disconnect the further fuser cables now visible.
- Remove the three black screws holding the fuser to the right side plate of the printer where the gears were.
- Remove the three black screws holding the fuser to the left side of the printer where the formatter was.
- Pull the printer frame apart slightly and the fuser will lift out.
- Carefully angle a new fuser into place and reverse those procedures.
If you don't have technical experience you should consider using a call-out or sending the printer for repair. The printer should be unplugged throughout the procedure so there shouldn't be any electrical danger. Nevertheless there are quite a lot of parts to replace correctly and the replacement procedure was not intended to suit end users.
Of course professional repair may well be uneconomic, given that brand new LaserJet M401s (the current successor to the P2015/P2055) start at £150.
Spares:
![]()
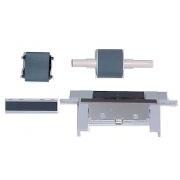
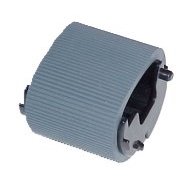
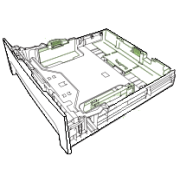
These printers come with a fold down multipurpose tray 1 for things like letterhead and envelopes and a cassette that slides into the base of the printer acting as tray 2 for up to 250 sheets of paper.
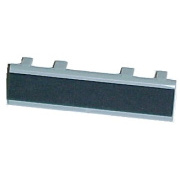
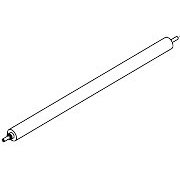
The pickup rollers and pads are likely to need replacing from time to time.
Wear sufficient to stop a roller working can usually be seen - there will be some clear wear to the texture. Wear on the separation pads may be visible as a slight hollowing in the middle of the pad. It is normal to replace the pad at the same time as the roller.
 |  |  |  |
Multipurpose Tray Roller

(*)RL1-1525 - Multipurpose Pickup Roller for input trays - RL1-1525-000CN
(*)RL1-1524 - Multipurpose Separation Pad for input trays - RL1-1524-000CN
The user guide gives instructions for cleaning the rollers. Follow the same instructions to replace the rollers. The user guide is Part Number CB366-90951 and it can easily be found by search engines. Very brief instructions are:
Changing the Multipurpose Roller
 Unplug the printer. Open the front cover. Remove the print cartridge.
Remove the pickup roller cover by squeezing it at the sides, releasing the left tab, then sliding to the left to release the right tab. The right tab is easily broken if the cover is not released at the left first.
The roller is now visible between two idle rollers. On either side of the central roller are two little black release tabs, press them outwards. Note where the retaining tabs are on the roller. Line the retaining tabs of a new roller up in the same way and fold it into the roller holder, the tabs should click back into place.
Avoid touching the roller - finger grease may degrade the rubber. Replace the roller cover and the cartridge.
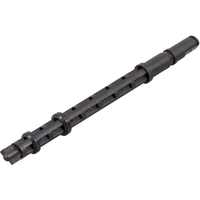
Main Cassette -Tray 2 Roller

(*)RL1-0540 - Tray 2 Pickup Roller. D shaped roller spindle with tyre. Does not include idle rollers at the side - RL1-0540-000CN
(*)RM1-1298 - Separation Pad assembly complete - screws into paper cassette - RM1-1298
Changing the Tray 2 Roller

Unplug the printer. Open the printer front cover, Remove the print cartridge. Close the cover and remove the paper cassette. Open the duplex door if there is one (d, dn and x models).
Turn the printer so that its front face is upwards and the roller in the front underside is visible.
The tray 2 roller is secured by white tabs running through the chassis at either side. Slide the right tab rightwards and then push the roller assembly that way - avoid handling the rubber parts. the roller should lift out from it's left side. Observe that the notches in the roller shaft are on the right.
To replace the roller insert the left side first. Then push the left end-cap right and the right end cap left to close the gap, rotate them back into their locked positions where they click into place.
Turn the printer right way up, close the duplex door and replace the cartridge

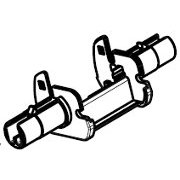
Other Parts
(*)RM1-4251 250-sheet paper input tray 2 cassette / tray. Pull-out cassette locates in the printer base.- RM1-4251-000CN
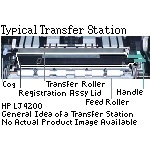
(*)RM1-4279 - Transfer Charge Roller - RM1-4279-000CN
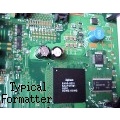
(*)Q7804-60001 Formatter PCA inc Firmware (P2015)-Q7804-60001
(*)RM1-4262 Laser Scanner Unit (P2015) - RM1-4262-000CN
(*)RM1-4244 Registration Assy (P2015) - RM1-4244-000CN
Service:
We can provide service in North East England
Here are some guidelines on faultfinding.
TroubleshootingRepetitive Image Defects
- 37.7 mm (1.48 inches) Primary charging roller
- 43.0 mm (1.69 inches) Registration roller
- 44.0 mm (1.73 inches) Developing cylinder
- 46.2 mm (1.82 inches) Transfer roller
- 56.5 mm (2.22 inches) Fuser film
- 69.0 mm (2.72 inches) Pressure roller
- 75.4 mm (2.97 inches) Photosensitive drum
A repeated problem down the page is usually caused by a small mark on a roller. The list can be used to suggest which roller is involved.
A continual stripe down the page is usually caused by greater damage to a roller. Take the cartridge out and examine the greeny-blue surface of the OPC to see if it has been damaged in some way. If no damage is visible on the OPC try a "stop test".
Stop Test
Set the printer printing a few pages on ordinary office paper with a fairly full pager cover - eg a report rather than light correspondence. Get a feel for where the page must be in the printer mechanism and when you believe a page has largely printed but not yet emerged open the lid. The printer will stop immediately and the result will be a paper jam that now needs to be cleared.
Take the cartridge out and examine the paper that has just moved beyond the print station. The page should be printed in loose toner. If the fault is visible on the page as it emerged from under the cartridge then the fault is not in the fuser. Possibilities are the laser scanner, the optical path, the cartridge and the transfer roller.
If the fault is only visible when the paper has been through the fuser then replace the fuser. (It isn't easy but can be done, see above).
Network Issues:
Check power and the network light on the RJ45 connector - if one light is on the printer is connected. If both lights are off the printer is not connected. Check the cables.
Print a network configuration page. Check that the IP address is in the correct range. If the IP address is incorrect or 0.0.0.0 see below. Check that the address matches that in the PC operating system printer utility. Do all PCs not print or just one - if just one then suspect its printer setup or firewall settings.
Ping the printer (at a command line type "ping 192.168.0.11" or whatever number your printer is set to). There should be a response in the form
- 64 bytes from 192.168.0.11: icmp_seq=1 ttl=128 time=3.50 ms
- 64 bytes from 192.168.0.11: icmp_seq=2 ttl=128 time=1.93 ms
- 64 bytes from 192.168.0.11: icmp_seq=3 ttl=128 time=2.01 ms
If there is no response to "ping" then the network has an issue or ping is being blocked by a firewall.
If the printer has an incorrect non-zero IP address reset the network port to factory defaults. This is done by holding "Go" and "Cancel" at the same time. The lights will cycle. Wait for a couple of minutes then print another network configuration page.
If the printer IP address is always 0.0.0.0 then it seems the printer cannot get a DHCP address.
Options and Accessories:
Q5931-67001 HP 250 sheet accessory tray (installs under printer). Laserjet P2014, P2015 and LJ1320 - Q5931A . As at January 2011 HP say this is no longer supplied. There might be stock in UK distribution.

Copyright G & J Huskinson & MindMachine Associates Ltd 2013, 2015. Some pictures derived from HP User and Service guides. These technical pages do not constitute an offer for sale; just our knowledge at the time of writing. See the catalog. Sales pages on this Web site use cookies to store user information. We also use Google Analytics to track site usage patterns.