
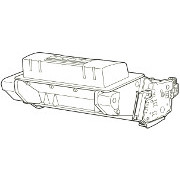
HP Original Cartridges
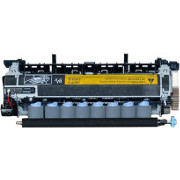
HP Maintenance Kit
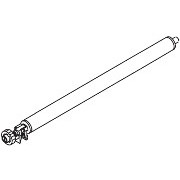
Transfer Roller
Reliable Remanufactured Cartridges
One of the merits of the P4014 against a new printer is the low cost of good re-manufactured cartridges.
At the moment we don't sell in the US, but we hope to soon
Maintenance Kit for HP LJ P4014, P4015 & P4515 Printers.
The HP LaserJet P4014, P4015 and P4515 printers are A4 mono laser printers aimed at workgroup use - HP claim a duty-cycle of 175,000 pages per month for the P4014 and 275,000 for the P4515. A more realistic use might be 3,000 pages per month and up. The basic CC364A (64A) cartridges have 10,000 page capacity and a two year life. The CC364X (64X) lasts 25,000 pages. These printers might not suit someone printing less than 500 pages per month (but might last a lifetime).
Maintenance kits are also consumables but with a long life - this kind of thing sometimes gets referred to as a "Customer Field Replaceable Unit". (HP don't provide the kits under warranty should you take the duty-cycle at face value and attempt to print 200,000 pages in a month.)

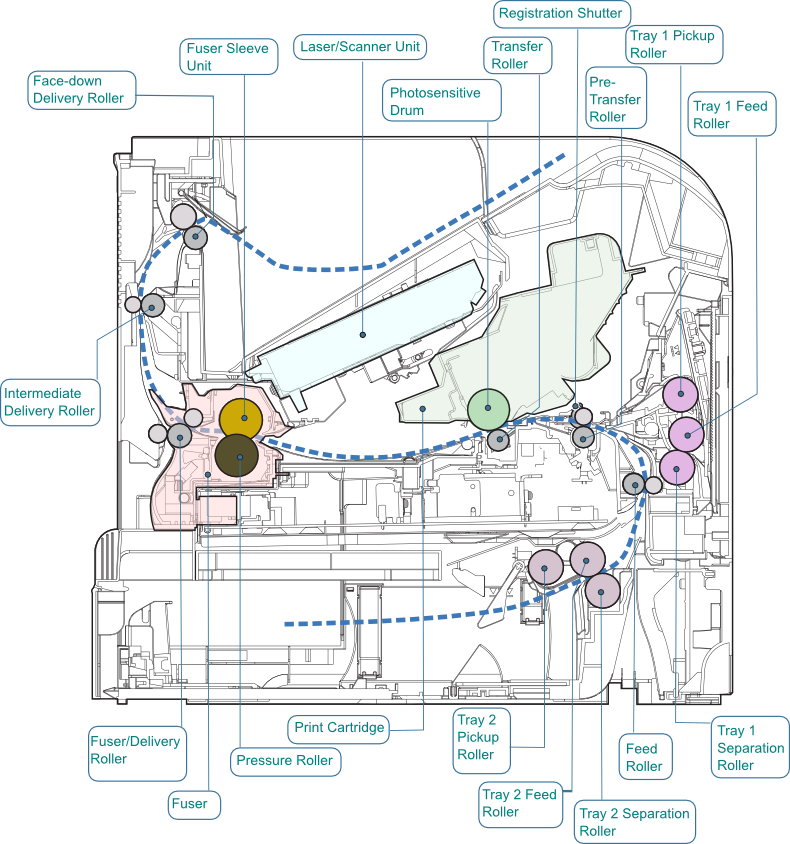
A Maintenance Kit contains a fuser, transfer roller and the paper feed pickup rollers.
- CB388A (CB388-67901)Maintenance kit for 110 VAC Printers- Includes fusing assembly, transfer roller, transfer-roller tool, tray pick-up rollers, eight feed rollers,and gloves. (Not normally available in the UK and EU, you may have to ask).

- CB389A (CB389-67901)Maintenance kit for 220 VAC Printers- Includes fusing assembly, transfer roller, transfer-roller tool, tray pick-up rollers, eight feed rollers,and gloves.
Perform Preventative Maintenance
The "Perform Preventative Maintenance" section is around page 134 in the user guide (ENWW version). The User Guide is part number CB506-90901, published 2008.
Preventative Maintenance is on P97 of the Service Manual Maintenance kits on page 344
Maintenance kit parts need replacing when the message PERFORM PRINTER MAINTENANCE
message appears on the control-panel display.
The maintenance message appears after printing around 200,000 pages and the kit is intended for a life around 225,000 pages. The message can be temporarily cleared for approximately 10,000 pages by using the CLEAR MAINTENANCE MESSAGE
item on the RESETS
submenu.
To check the number of pages printed since new maintenance-kit components were installed, print either a configuration page or a supplies status page.
Both complete preventative maintenance kits and individual maintenance kits for paper feed problems are available.
The complete preventative maintenance kit includes the following items:
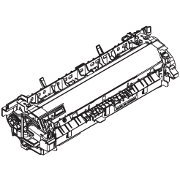
- Fuser
- Transfer roller
- Plastic tool for removing the old transfer roller
- Pair of gloves for handling the new transfer roller
- Feed and separation rollers for the other trays (but probably not pickup rollers in HP kits)
- Installation instructions
HP say:
A maintenance kit is a consumable item and is not covered under the original product warranty or under most extended warranties. Installing a maintenance kit is the customer's responsibility.

The following individual maintenance kits are also available.
- Multipurpose tray kit - CB506-67905
- Printer roller kit for trays 2,3,4,5,6 - CB506-67904
- Transfer roller kit - CB506-67903
- Fuser alone (110 V or 220 V)
Installing the Kit(s)
Turn the printer off and remove the power cable. Whilst no power connections are actually exposed the fuser is mains powered - and is not hot-pluggable.
Also remove the cartridge, especially if you are going to clean the printer (which would be a good idea). Put it in a dark place (in a drawer or a black cartridge bag).
Remove any duplexer from the rear, it lifts and pulls out of its slot.
Remove the Face-up tray which doubles as the rear-door. It is held in place by two plastic bosses, pull the right side out and the left comes free.

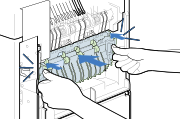
The fuser is now visible, it is held by two plastic latches at either side, lift them and they disengage, the fuser then lifts and pulls out - it may be a bit stiff because of the electrical connector on the underside.
Before putting the new fuser in place, clean the printer innards
Make sure both plastic latches on the new fuser click into place.
The transfer roller is held in by clips. It can be lifted out using the plastic tool that comes with the kit.
After a maintenance kit is installed, the maintenance-kit counter should be reset.
Reset the maintenance-kit counter
- 1. Turn the product power off and then on. When XXX MB appears on the control-panel display, press and hold down the OK button until ...
- 2. All three control-panel lights flash once, and then stay on. This might take up to 10 seconds.
- 4. Press OK to reset the maintenance-kit counter.
Older printer firmware doesn't have the entry in the startup service menu. For these:
- Press Menu
- Press down-arrow to select CONFIGURE DEVICE, then press OK.
- Press the down-arrow to highlight PRINT QUALITY, and then press OK. (Printers with a duplexer do steps 4,5,6 themselves).
- Press down-arrow to CREATE CLEANING PAGE, and then press OK.
- Remove all paper from Tray 1
- When the cleaning pages comes out of the output bin load it face-down in tray 1.
- Press down-arrow to get PROCESS CLEANING PAGE and then OK
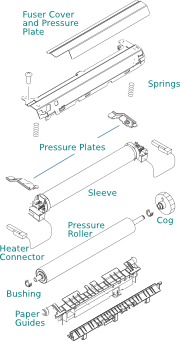
- The Sleeve Assembly is a sleeve or cylinder of non-stick plastic wrapped around a ceramic heater element. The ceramic heats up very rapidly when power is applied. The sleeve rotates with paper passing through the fuser and prevents toner smearing on the page.
- The Pressure Roller is a fairly hard rubber-like material that pushes the paper hard up against the sleeve and the heater just behind it. The pressure roller needs to resist both temperature, pressure and contamination by toner that doesn't adhere perfectly to the paper.
HP say:
NOTE: Perform this procedure only after a maintenance kit has been installed. Do not use this procedure to temporarily clear the PERFORM PRINTER MAINTENANCE message.
If you have sole use of a printer you are at liberty to disregard the printer's maintenance counters or treat them as mere reminders. Unlike a car, which really does need maintenance to prevent failing parts damaging others, almost nothing in a laser printer will actually take any harm from ignoring the maintenance interval.
Shared printers and critical printers are a bit different. If you share a printer with others who might not be familiar with it then they may be alarmed at having to change the cartridge and puzzled by weird messages or unfamiliar procedures. The maintenance messages are set at reasonable intervals so that the warning will happen before the faults become annoying.
Maintenance and Cleaning
Changing something like a fuser is a good time to give printer innards a clean. With the cartridge and fuser out there is a clear path from front back to lower rear of the printer and any small deposits of toner can easily be reached. Wear disposable gloves - a set come with the full HP maintenance kits. Don't use an ordinary vacuum cleaner - toner will pass straight through the filter and be airborne in the room.
These printers have a cleaning mode
The cleaning mode seems mainly to be aimed at the fuser rollers rather than stray toner in the body of the printer. If there is stray toner lying around it probably needs cleaning out with a brush or cloth.
The "Clean the product" section of the user guide in around p 146 of the ENWW version.
Maintenance Need
HP print cartridges provide toner powder that acts as "ink" on the page; they also provide a new developer and drum.
Maintenance kits replace the other parts of the printer that are likely to wear out; the fuser and the rollers involved in paper pickup.
A laser printer fuser adheres toner powder to the paper using a combination of heat and pressure. The CB506-67902 fuser used in the HP_LJ_P4014 etc has two main parts:
Fusers tend to be prone to two faults: the heater fails and ultimately the sleeve wears out, particularly at the edges. The 225,000 page life suggested for these fusers is quite long for a mono printer - and adds less than 0.1p to the per page price.
Pickup rollers are soft rubber with a textured surface that engages with and grips that of the paper. After thousands of pages the texture declines so that the roller is no longer as reliable, paper misfeeds become common.
Is the Maintenance Kit Worth It ?
These printers cost upwards of £600 when they were bought. They are fast and usually reliable. New printers of the same quality cost over £400+ (M601N) to £1200+ (M603X) - and are just fractionally faster. Changing the parts in the kit gives the effect of a new printer with very little risk. HP's kits are intended to be user-changeable and under warranty.
HP Information
HP responded to a wildcard query on CB389 (July 2013) with:
CB389-67901 - Maintenance kit - For 220 VAC - Includes fusing assembly, transfer roller, transfer-roller tool, tray pick-up rollers, eight feed rollers,and gloves
CB389-67901BULK - Replacement 220v Maintenance K
CB389-67901BULKRU - Replacement 220v Maintenance K
CB389-67902 - Replacement 220v Maintenance K
CB389-67903 - Replacement 220v Maintenance K
CB389-67BULK - REPLACEMENT 220V MAINTENANCE K
CB389A - HP LaserJet P4014/4515 PM Fuser 220 VAC Kit
CB389AR - HP LaserJet 220V PM Kit
HWP-CB389A - LaserJet 220V PM Kit
There has clearly been some evolution of the part over time. The correct current part is a bit less interesting:
CB389-67903 - Replacement 220v Maintenance Kit
Icecat didn't respond to a query on CB388A, however it did for CB389A. It includes the following information.
Guarantee: Warranty: One-year, return to HP authorized service center, limited warranty. HP warrants to you, the end-user customer, that HP hardware and accessories will be free from defects in materials and workmanship after the date of purchase, for the period specified above. If HP receives notice of such defects during the warranty period, HP will, at its option, either repair or replace products which prove to be defective. Replacement products may be either new or equivalent in performance to new.Note that the page yield of devices like fusers for this printer is around 225,000 pages and HP might not honour warranty on a fuser that has clearly delivered this. (Also Note: There seem to be regional variations in HP warranty terms on parts. )
Long summary description HP CB389A Kit for Printer & Scanner: HP CB389A. Weight: 116.8 oz (3.311 kg), Dimensions (WxDxH): 19.4 x 9.33 x 13.7 inch (492 x 237 x 349 mm)
CB389A has GTINs (EAN/UPC) 0883585279999 5704327466628 5704327655008
In July 2013 Icecat seemed to have an incorrect picture for this part (looking somewhat like a 9050 fuser. A great many sites reflected this so Icecat data is clearly being widely used).
Web Research
Google suggests About 81,600 results
for CB389A
Although a great many sites offer to sell this part only a few UK sites offered anything beyond the distributor's and HP's boilerplate
Our price in July 2013 is £220.82. Other prices found are: cartridgemonster.co.uk £277.73, printware.co.uk £269.00, cartridgesave.co.uk £215.61, stinkyinkshop.co.uk £218.68, toner-ink-cartridge.co.uk £227.00, shima-uma.com £232.18.
A repeat exercise on About 83,200 results (0.18 seconds)
a couple of weeks later gave About 83,200 results (0.18 seconds)
and 3 ads for tonergiant.co.uk, hpprinterstore.co.uk and cartridgesave.co.uk. Organic search gave:
www8.hp.com/uk/en £309, www3.hp.com $319.00, tonercare.co.uk £209.12, amazon.co.uk (office clearance free delivery)£279.99, cartridgesave.co.uk £217.42, staples wants postcode, misco.co.uk £259.57, rightparts.co.uk Refurb £124.95 New £234.99, fastprinters.com $365.76, amazon.com (fuserzone) $320.00, shopbot.com.au Price Range $483.07 to $604.00 AU, printerinks.com £264.95 in vat =£216, .officespecialties.com$328.59, printware.co.uk, £269.00, databazaar.com $357.87 (free shipping), alfatec.co.uk £198.00 (doesn't say refurb), alibaba.com (china eternal) no price, techbuy.com.au $523.60 AU, ink2u.co.uk £218.88, hpfuserkits.com (Slon)no price, costcentral.com $305.78, incoreweb.com 299.00 € HT, hpprinterstore.co.uk (refurb)£130.00, tonersandinks.com £263.95, officesuppliesnow.co.uk £282.77, producton.eu login only, jp-uk.co.uk £228.90, twenga (ad), partshere.com new $394.76, compat $296.07, refurb $256.60, tonercartridgedepot.com $360.00.
As so often happens the sites boasting "Price Watch - We check prices daily to make sure we are the cheapest" and "Price Promise - We will not be beaten on price - GUARANTEED" were actually most expensive. Furthermore they had put no effort in beyond downloading the Icecat data. Two sites were marginally cheaper than us. (Boasting inaccurately of low prices is a marketing lesson we'll ignore).
Supply Situation
The maintenance kit market is divided in two. Most of the world uses 200 Volt power (this page) whilst the US uses the CB388A for 110 volt power.
A maintenance kit contains a set of feed rollers, a transfer roller and a fuser. As it happens there is a compatible maintenance kit from Nupro
at a rather lower price - our web research suggests people selling kits at an impossibly low price are selling this. We have no quarrel with Nupro but do not currently chose to sell the product. Some vendors seems to be trying to confuse buyers.
The expensive part of a maintenance kit is the fuser, which is largely a piece of complicated metalwork and plastic. A fuser wears out. The part of a fuser that usually fails is the sleeve which is a tube of "teflon" type material. In principle the tube can be made for little more cost than oven-liner except someone has to set up a production line to do that. Fuser components are not particularly cheap. Replacement sleeves are available from several Chinese vendors; we are skeptical of their quality. Rebuilding a fuser also needs high temperature grease which must be of the right consistency or it will damage the sleeve, heater and perhaps the fuser bushings. Ideally a new heater and bushings are needed as well, and possibly a stock of connectors opto-interrupters and the brown drive cogs.
All the distributors we deal with have stock of the CB389A in July 2013 almost invariably under the code CB389-67901.
The P4014 printer series is no longer manufactured, it has been replaced by the LaserJet Enterprise 600 M601. The P4014 was withdrawn in 2012. HP say they will supply parts for five years after last manufacture and in practice they often far exceed that if there is continuing demand.
The P4014 series printers are fairly reliable and a new maintenance kit will extend the printers life for a further 225,000 pages. The kit is more expensive than some printers, but then those don't have the speed, reliable build quality, expandability and ease of maintenance of these machines.
We supply both maintenance kits and fusers frequently. A new maintenance kit is needed for every 10-20 cartridges used.
The price for new original products has tended to be between £180 £230. This works out at about 0.1p per page of print - a tenth the cost of cartridges.
Kits with a refurbished fuser ahave varied between £75 and £90 but that price will vary and the product may not always be available in distribution. (Variations reflect fluctuating supply of cores, components and currency). We supply refurbished kits because they meet a need amongst maintenance companies and self maintainers. However if you rely heavily on a printer we recommend the HP new product; refurbished fusers undoubtedly are less reliable.
Price and availability are guidelines, our prices change with distribution lists - see the catalog. Stock numbers indicate there is continual demand for this part. We would expect HP to be offering the part for at least five more years because once they wind up kit production the market for toners will dry up. Kits are still available for the LJ-4200 which is 6 years older than the P4014 (there are still a lot in use). Printer manufacturers like to keep their machines working to keep up sales of cartridges.
Copyright G & J Huskinson & MindMachine Associates Ltd 2013, 2015. Some pictures derived from HP User and Service guides. These technical pages do not constitute an offer for sale; just our knowledge at the time of writing. See the catalogue. Sales pages on this Web site use cookies to store user information. We also use Google Analytics to track site usage patterns.