
Changing Maintenance Kit Parts
For HP's Big Mono Laserprinters - Laserjet P4014, P4015, P4515, M601, M602, M603, M604, M605, M606 Series Printers
HP has developed a family of big mono laser printers from 2002 on with the LaserJet 4200 and its successors. They all share a design theme: cartridges scaled to deliver 10 or 20 thousand pages, rollers that clip into place and a fuser that does likewise. This creates a printer that is not only easy to maintain but in large part ordinary office and factory staff can do it. Some organisations might prefer IT staff to change things like rollers and fusers, they get good at it, so that it becomes a quick and easy job.
In its latest incarnation such as the M601, M602 and M603 (2011) and as the M604, M605 and M606 (2015) HP are quite clear that maintenance kits are user changeable. The communication codes requesting a kit have been moved to the "10" range for consumables. "Maintenance Reset" is an ordinary menu item instead of an obscure technical procedure. Every part in the M601 maintenance kit can be changed without a screwdriver. Even the Tray-1 rollers (rarely changed) are held back by just one screw. Whilst HP haven't turned a printer into a Lego kit that day may be in sight.
What HP Say
For the LaserJet P4014 familyTo ensure optimum performance from the product, replace certain parts when the PERFORM PRINTER MAINTENANCE message appears on the control-panel display.
The maintenance message appears after printing 225,000 pages. The message can be temporarily cleared for approximately 10,000 pages by using the CLEAR MAINTENANCE MESSAGE item on the RESETS submenu. To check the number of pages printed since new maintenance-kit components were installed, print either a configuration page or a supplies status page.
HP P4014 series service manual part CB506-91004.
The LaserJet M601 has different messages: Maintenance Kit low, Maintenance Kit very low and then Replace Maintenance KitMaintenance Kit low The maintenance kit is low. The actual supply life remaining might vary. Consider having a replacement maintenance kit available to install when print quality is no longer acceptable. You do not need to replace the maintenance kit at this time unless print quality is no longer acceptable
HP M601 series User Guide.CE988-90901
The LaserJet M604 documentation is very thorough on the codes and how to do the physical procedure - but a bit obscure on the maintenance messages and reset. No doubt that will be rectified.
HP M604 series User Guide. E6B67-90907
Maintenance Prompt
Printers ask for a maintenance kit after 225,000 pages (or perhaps 10% before that). There is usually a grace period before print degrades or the fuser falls to bits. People are at liberty to ignore the warning, but since these printers are almost always used for professional printing rather can casual use it would be wise to buy a kit.
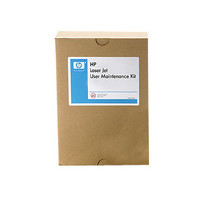
Check the Kit
First step in changing a kit is to make sure you have, in fact, got the right one. Check the label. It is not unknown for buyers to make a mistake and buy a P4015 kit for an M601 for instance - the printers look similar and the rollers fit. The fuser fits as well but it won't work; the faster model printer has a more powerful heating element. Warehouses can send the wrong one - even if barcodes are checked all through the chain. If the kit isn't right according to the label don't open it, contact the supplier and arrange an RMA (Returned Materials Authorisation). Spares that have been opened cannot easily be resold - clothing can be, but not electronic spares.
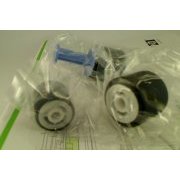
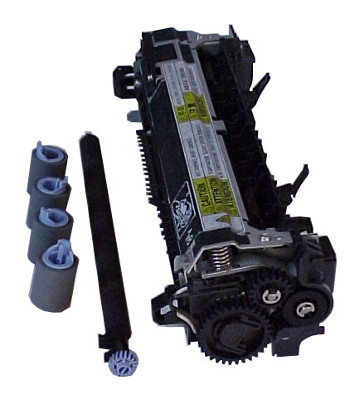
If the labelling is OK open the box and check the contents against what you expect. HP include a little blue hook for the transfer roller, gloves and instructions. They also ship five sets of feed and separation rollers (wastefully as most printers do not have five cassettes). HP do not seem to ship the white-cored roller RM1-0036 although some brown-box and refurbished kit makers will do. Brown box kits may not have the blue hook, gloves and instructions.
The fuser is labelled on the front. Check it as well. These things come out of factories where 110 and 220 volt devices for P4014, M601 and M604 are all on palettes and picking errors will happen.


Changing The Fuser
Change the fuser first is best. This may be important with refurbished kits as the fuser is most likely to fail. (We don't want to be rude to our colleagues in the recycling industry, but they could test things more thoroughly. HP originals cost more but there are fewer issues - although not zero ).
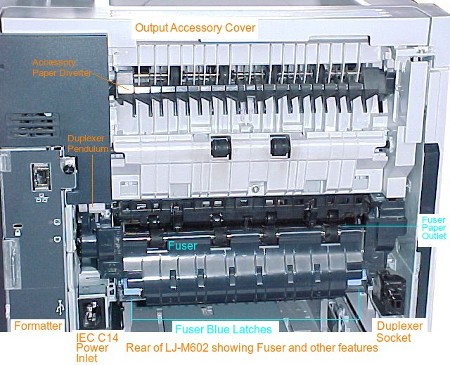
To change the fuser you need to be able to get clear access to the rear of the printer. Turn the printer off at the power switch. Touch the formatter handle to discharge any static your body might carry and unplug the printer as the cable will otherwise be in the way. It may be worthwhile unplugging the network cable as well as it will be inconvenient if the printer bursts into life immediately it powers up.
Remove the duplexer if it is present. It lifts up fractionally and pulls out. (All these actions are sometimes needed to clear obtuse paper jams).
The printer rear door needs to be lowered. At the lower left near the power socket it has an arm with a nub on acting as a hinge. There is a finger recess in the arm, push on the arm somewhat and that side of the door will slide out of the printer. Watch where each side of the door is coming from, as it will need to go back. The hinge points are just a pair of rather unimpressive holes in the metalwork. Lift the door away.
The fuser innards will be scalding hot if the printer has recently been in use - sufficient to produce minor burns if the rollers are touched without caution. (Not much hotter than lamps or steam irons, but beware! ). The fuser body may be warm to the touch. Rather than burns, the problem may be broken toes if people don't expect a hot thing!
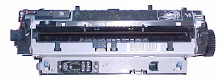
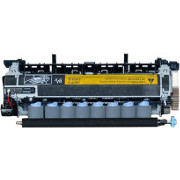
fuser front showing connector
The fuser is secured by a blue clip at either side of its base, lift both clips and pull the fuser as straight out as possible. It will resist a bit, as there is a big connector on the front right. With a couple of slight wiggles it will come free.
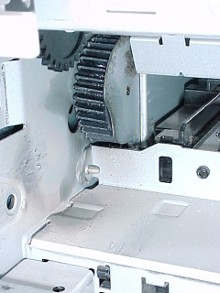
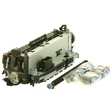
Fuser drive cog showing metalwork contamination. This level seems acceptable and inevitable - probably aerosol particulates from lubricant. An accumulation of muck would raise questions.
It is worth examining the fuser gear inside the printer for any sign of excessive wear. The gears are subject to a bit of wear and there was an issue with LJ-4200 gears wearing out prematurely. A sign is grey powder on the metalwork just under the gear position.That problem has diminished with more recent models.
A new fuser will simply slide into place. A bit of pressure is needed as the captive connector plug engages with its mate in the chassis.
Make sure that the fuser goes fully in and the two blue clips click home. (Earlier clip designs were one cause of the gear wear problem).
Put the door back on. The printer can be powered up now and if a refurb fuser is used it might be wise to do so as it is annoying to change all the parts and then need a warranty return. If the printer goes to ready
then at least basic workability is proven.
Old fusers have a value for refurbishing - and to HP. Put the old fuser back in the box.


Changing The Transfer Roller
The transfer roller is located under the cartridge. Open the top front cover and lift the cartridge out putting it in a clean place out of bright light. (Seeing inside the printer needs fairly bright light, but the cartridge drum is damaged by too much light, so maybe cover the drum with paper or a box).
The transfer roller is visible in the bottom of the print-cartridge well, midway to the rear of the printer. The bulk of the roller is matt-black (somewhat conductive carbon impregnated plastic) It has a blue cog signifying "customer replaceable".
Toner commonly accumulates near the transfer roller, particularly if you get a rogue refurbed toner (leaky recovery blade). If there is a lot of toner here it needs to be removed. The proper way to remove it is a vacuum cleaner rated to handle toner. Improper ways include blowing it out with compressed air (messy) or taking it out a bit at a time with slightly damp tissue - but with the power off until it is completely dry. The power supply board is just underneath the transfer roller; damaging it could be fatal to the printer - and you!
If you have the blue hook tool and gloves they may help. The tool is used to lift the transfer roller out and the gloves are not so much to protect you from toner (although they help) as to protect the new roller from handling. The roller can also be lifted by the cog, or use a small screwdriver to push the metal shaft up. There is a black plastic clip next to the cog, observe which way round it goes - the teeth point down.
Notice that the transfer roller has a bit of a tendency to slide out of the blue plastic cog so support it at both ends.
Wearing gloves if you have them, put the new transfer roller in place, make sure the clip teeth point down. Try not to handle the rubber of the roller unnecessarily; hold it by the shaft end and the cog.
So far as possible handle new rollers with the hand-grip or with gloves on. In principle the rubber might denature with grease from hands (it isn't usually all that sensitive).
Replace the cartridge and if it slides home correctly close the lid. Transfer rollers are unlikely to be faulty if there was no visible damage so there is probably no need to test the printer at this stage.
We don't know of old transfer rollers having a value beyond metal recovery. If you are recycling the fuser it may as well go too.

Changing The Feed Rollers
The roller that is easiest to see is that in the cassette tray, called the separation roller. We suggest doing that first. Take the cassette tray entirely out of the printer; it may need lifting slightly at the rear left to clear a securing pin.
If there is much paper take it out of the tray to prevent it getting damaged. There is a spring-loaded hatch next to the roller, hold it open. The roller is mounted on the end of an axle next to the torque limiter.
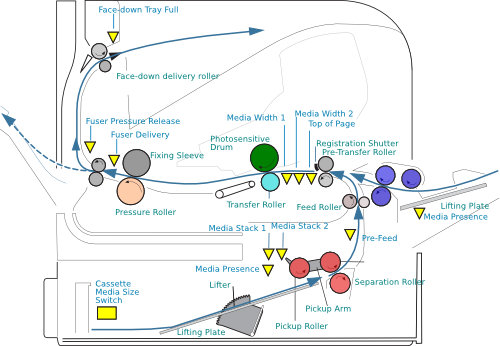
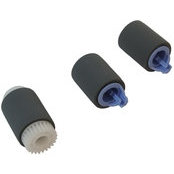
Cross section of the printer. Only the soft rollers marked red are replaced in the standard kit, and in HP kits just the feed and separation rollers.
A feed-repair kit contains all three rollers.
The tray-1 rollers marked in blue are available as a separate kit.
Other rollers are hard and put high pressure on the paper so they manage to propel it without suffering much frictional wear.

The roller has a little hand grip at one end and just next to that a plastic latch. Hold the latch and hand-grip together and the latch comes away from a groove cut in the axle and the roller simply slides off.
A replacement roller slides onto the axle. It may need rotating a bit to sit correctly on the torque limiter, and sometimes the torque limiter needs rotating to sit back on the split-pin through the axle. When the latch clicks home and the roller is secure the job is done.

The remaining rollers are in a pair inside the cassette drawer space.
The feed roller at the front and is identical to the one in the cassette. It is normally the one that shows distinct wear and definitely needs changing. The only additional problem is that the space can be somewhat dark.
Feed and separation rollers work together but attempt to rotate in opposing directions. Normally the feed roller wins and pushes one sheet of paper off the paper stack against the feed roller and up into the printer. If two or more sheets of paper move off the stack the separation roller wins with the lower sheets and pushed them back. Because these rollers push against one another they wear out through friction.
The white roller is usually called the pickup roller (code RM1-0036). Its job is to move the paper an inch or so to the nip-point between the feed and separation rollers. This isn't normally much effort so the roller shouldn't wear out all that often. If you have the roller to hand then change it - they come in feed repair kits (but perhaps not) in HP official maintenance kits.
There is no known use for old rollers. One possibility is making the stereotypical Aussie cork hat - wine corks are a rarity these days. If you are recycling the fuser put the rollers in, someone may come up with a use for a tonne of them.
| Printer | 110 Volt | 220 Volt |
| M604, M605, M606 | F2G76A | F2G77A |
| M601, M602, M603 | CF064A | CF065A |
| P4014, P4015, P4515 | CB388A | CB389A |
Resetting the Maintenance Count
For the LJ-P4014
The LaserJet P4014 reset is slightly hidden.
- 1. Turn the product power off and then on.
- 2. When XXX MB appears on the control-panel display, press and hold down the OK button until all three control-panel lights flash once, and then stay on. This might take up to 10 seconds.
- 3. Release the OK button and press the up arrow
- 4. Press OK to reset the maintenance-kit counter.
HP Service Manual CB506-91004 - Manage Supplies ENWW p83
For the LJ-M601
With the M601 series HP decided changing the maintenance kit was definitely a user matter and bought the mechanism out of hiding, placing it in the Administration "Manage Supplies" menu.
To reset the maintenance kit count the manage supplies menu has a "Reset Supplies > New Maintenance Kit > Yes ". For the M601 series (M601, M602, M603)
There are instructions under the heading "Perform preventive maintenance" (page 100) of the User Guide. * The user guide (Part number: CE988-90901) has a picture guide in chapter 10 "Solving Problems".
The service manual (Part number: CE988-90945) lists the manage supplies options (Administration > Manage Supplies) on page 256; including the - New Maintenance Kit- reset.
For the LJ-M604
For the M604 series the User Guide (Edition 1 E6B67-90907) doesn't appear to say how to do the maintenance reset - and neither does the "Service Repair" manual (no document number). (At least under phrase "maintenance" or "fuser kit"). Luckily the "Service Troubleshooting" manual ( p192) makes clear that it's in manage supplies > Reset Supplies > New Maintenance Kit > Yes
Web Research
Web research on the maintenance kits is reflected on their individual pages.
Supply Situation
Maintenance kits for these printers are common items. People don't buy mono printers that cost more than £400 and accessories that may cost £1000 or more and then use them for the odd bit of printing; these machines sometimes run continually and clock through a maintenance kit in a month or so.
Distributors generally hold stock of the P4014 kit (CB389A) in tens and hundreds (In June 2015).
Curiously, although the M601 series printers have been out there since 2011, only one distributor shows significant stock of CF065A although half a dozen list it, - either it hasn't been wanted much or was temporarily in constraint !
The M604 fuser F2G77A was only listed by two distributors (in June 2015) and neither had any stock. Presumably the idea that there will be widespread demand has yet to take hold. Most of the buyers in spares distribution are cautious, and buy on proven demand, not in anticipation.
There is a small demand for 110 volt maintenance kits in Europe; for instance they are used on board ships and sometimes on construction sites (lower voltages are rather safer). A couple of distributors have P4014 110 volt kits (CB388A) in very small numbers.
A the time of writing (June 2015) we can supply maintenance kits for the P4014 for next day delivery. Others should be available but may take a day or so. Our catalogue pages will reflect the current situation.