HP Original Cartridges
(The "X" size won't fit the M601)
Reliable Remanufactured Cartridges
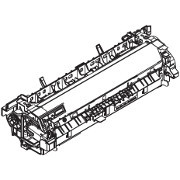
Fuser
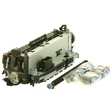
Maintenance Kit
On Prices
At the time of writing in July 2015 we offer maintenance kits at a significantly lower price than a fuser and the rollers as separate components. The logistics and support issues of sending a kit are usually better than those of selling components separately. However things don't always work out this way.
The Need for Fusers
Fusers are the dark secret of laser printers, as printheads are for inkjets; they don't last forever. Actually inkjet printheads often fail to reach a few thousand pages - which is worse than low-end laser printer drums. Fusers last tens or hundreds of thousand pages. This one is rated for 225,000 pages - and can probably exceed that.
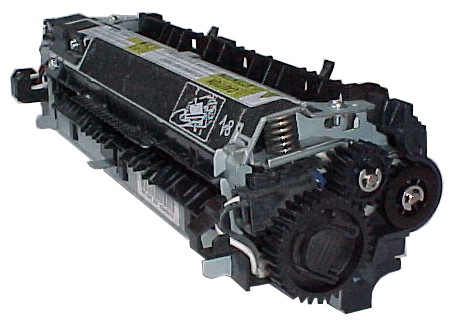
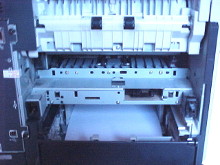
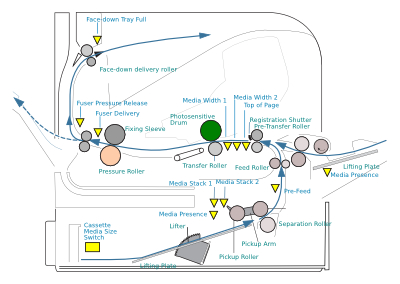
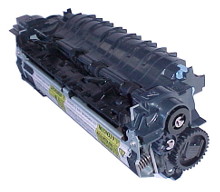
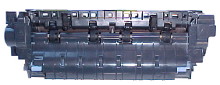
The fuser is marked orange in the diagram. Paper is pushed up and out of the cassette tray, through the rollers and under the cartridge marked in green. The transfer roller pulls an image made in toner powder away from the photosensitive drum and onto the page. The page then passes into the fuser where it passes through a nip-point between the pressure roller and the heater inside the fuser sleeve, which acts as a top roller. The toner turns tacky in the fuser and the pressure forces it into the pores of the paper giving the characteristic robust print.
Fuser life is limited, they wear out, for reasons we'll return to. Fusers commonly last between 50 and a hundred thousand pages in little printers with small rollers. Manufacturers use them as the life-limit on the printer in practice, since in most little machines they are quite difficult to change and mean removing screws and unplugging internal wiring. So when the fuser in an HP P1102, Canon LBP6200 or Lexmark E230 fails people are quite likely to buy another printer.
US, Canadian and Japanese readers need to look for the 110-120 Volt version of the fuser RM1-8395 / CE988-67901.
The M601 series are different; the RM1-8396 fuser should last beyond its rated life of 225,000 pages and is easily replaced, it just plugs in. Quite a lot of colour printers and big mono printers are built this way. The M601 and its successor the M604 are just quite notably neat - completely user changeable, not even a thumbscrew.
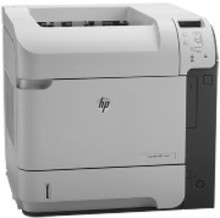
HP LaserJet M601, M602 and M603 printers are A4 mono laser printers designed for fairly high volume use - large workgroups in medium to large organisations.HP primarily positions these printers to handle high workloads. The recommended monthly volume ranges from 3,000 page per month at the low end of the M601 capability up to 20,000 pages at the high end of the M603 range. Maintenance kit settings are for 225,000 pages and the maintenance kit includes a fuser - so the suggestion is that in heavy use a printer might need a new fuser once a year. However these are fast, robust printers and if one was kept going 24 hours per day then it could exhaust that 225,000 page-count in less than 3 days.
HP give two figures that suggest printer durability and how it might be used: Recommended monthly volume
and Duty Cycle
| Models |
| HP LaserJet M601 | HP LaserJet M602 | HP LaserJet M603 |
| Recommended monthly volume |
| 3000 to 12,000 | 3,000 to 15,000 | 5,000 to 20,000 |
| Duty Cycle |
| up to 175,000 pages | up to 225,000 pages | up to 275,000 pages |
Duty cycle claims are often rather high. The basic CE390A cartridges have 10,000 page capacity, and the CE390X 24,000 page capacity so if the printer was used anywhere near it's supposed duty cycle it would get through nearly 12 cartridges - and might need a new fuser in a month.
The LaserJet M601 series fusers look like those of the closely connected P4014/P4515 series printers and will actually plug in - but they won't work and the printer should give an error message. Likewise they shouldn't work in the later M604 series (~we don't know yet). Fuser heaters and thermistors are usually paired with a specific printer design - unnecessarily perhaps.
Price of Fusers
Fusers are quite expensive; a bit more than the price of the big "90X" cartridge.
To put this in perspective the fuser life is nearly ten times longer so it is expensive but contributes very little to running costs
Other parts used up in operation are the feed rollers and transfer roller. They are often bought in a bundle as a maintenance kit.

User Changeable Maintenance Kits
Laser printers to fit in an office or even on a desk became practical with Canon's invention of the print-cartridge for its personal copier in the early 1980s. Before that, printers and copiers were big and needed frequent engineering attention.
Laser printer fuser units have sometimes been classed as engineer changeable consumables
. This causes aggravation because the cost of a fuser is not covered by warranty and sometimes the call-out charge for the engineer isn't either.
A fuser is basically a hot roller and a pressure roller; paper passes through the nip-point between them. However they run scalding hot and use a significant amount of power so it is only quite recently that manufacturers have turned them into plug-in modules - cartridges in effect.
Plug in fusers are only available on larger and more expensive printers. On smaller machines changing the fuser is a screwdriver job.
Making the critical parts user changeable is a significant difference to the economics and environmental effects of running a printer. There no specific upper limit on it's life.
This isn't a completely modular printer although cartridges and maintenance kits can certainly keep it running beyond a million pages.
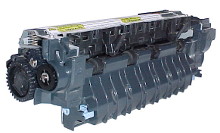
RM1-8396 Fuser
There are two versions of the fuser:
- RM1-8395 110 VAC Fuser for the US, Americas, Canada and Japan
- RM1-8396 220 VAC for Europe, UK and most of the rest of the world.
Note that these part numbers are often given as RM1-8395-000CN and RM1-8396-000CN. For the most part the suffixes 000CN, 020CN and so on represent trivial differences in production that can't even be discovered in the "service advisory" notes. (But exact codes can be revealing).
The service manual (CE988-90945 Edition 1 2011) actually gives several codes. RM1-8395-000CN is the "Fuser Assembly 110V" and RM1-8396-000CN is "Fuser Assembly 220V". CE988-67901 (110 V) and CE988-67902 (220 V) get you a "Fuser Kit" - a fuser and instructions. The term "fuser kit" might be used for a maintenance kit with a fuser in it - but that would be CF065A (CF065-67901) etc. Product coding is horribly internecine.
A fuser draws quite a lot of power when it operates so they are usually designed for the electricity supply of the region they will be used in.
Fusers are usually only available in the correct voltage for the region. In practice construction sites and some ships use 110 Volts in Europe, whilst some data centres prefer 220 Volt in the US. HP can ship fusers and maintenance kits anywhere on about 3 days notice. Distributors are often unwilling to do it, so if you need a 110 Volt fuser in the UK there may be a delay.
Actually this kind of fuser has a couple of tracks on its ceramic heater and we think it would make sense to make one kind of fuser and run the tracks in parallel for 120 volt use and in serial for 220 Volt use. Manufacturers like "regionalising" the market so they can charge one price in the US and another in Europe.
Changing the Fuser
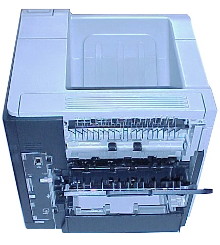
The fuser in the LaserJet M601 series is like that of predecessors LJ-4200, and P4014 in being user changeable; its actually the same process as removing a paper jam in the fuser.
The easiest way to check the life of the fuser is probably through the printers internal Web pages - a Supplies Status Page
gives the life of the toner and the maintenance kit as a bar graph.
To remove the fuser:
We added a new web page on how to change a full maintenance kit here
- Switch the printer off and unplug the power cord.
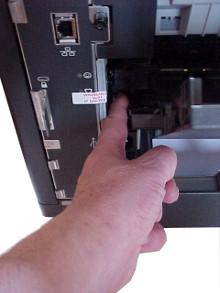
- Remove the duplexer if it is there. Lift slightly and pull it out.
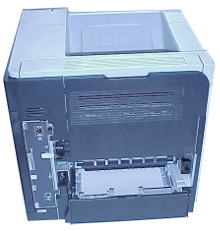
- Remove the rear output bin. Open the cover and it can be seen to pivot on two plastic arms, gentle pressure will free one - the left hand side has a finger pressure point and is easiest. (It ought to be blue to signify user attention). Observe the position of the plastic arms as getting them back can be a little awkward the first time.
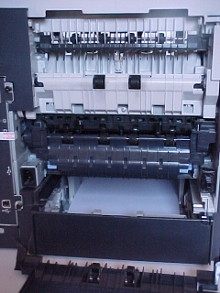
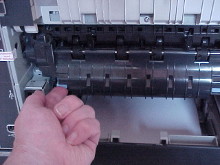
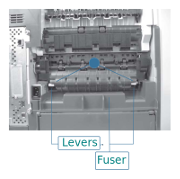
- To remove the fuser. Squeeze the blue fuser-release tabs at either side of the fuser. Pull the fuser up slightly and wiggle it slightly until it comes back and out of the printer to remove it. It resists a bit because of the tight electrical connector at the front.
To replace the fuser
- … reverse the steps above.
- Make sure both blue clips click home - they are usually audible.
- Put the rear output bin back in place - and the duplexer if there is one.
- The last stage is probably to reset the maintenance count.
Resetting The Maintenance Count
If the fuser has been replaced then the maintenance count should probably be set to zero. Otherwise the printer will still prompt for a new fuser somewhat before the replacement should come to the end of it's life. To simply reset the maintenance kit count the supplies menu has the entry under Administration > Manage Supplies > Reset Supplies > New Maintenance Kit > Yes
. If you need further information there are instructions under the heading Perform preventive maintenance
(page 100) of the User Guide.*
The user guide (Part number: CE988-90901) has a picture guide in chapter 10 "Solving Problems".

Note that the fuser should be hot when the printer has just been in use. HP recommend allowing the fuser to cool for 5 minutes before handling it. (Sometimes they say 30 minutes and it does take a while to cool, but few technicians can afford to take 30 minutes out). The fuser can inflict minor but painful burns just like a cooker or a clothes-iron. Fuser parts are delicate, the plastics are meant to work at high temperatures and are brittle. A fuser will be damaged if it is dropped.
If the printer should have worked but the fuser is stone cold when removed that suggests heater failure. However be cautious about touching metalwork and do not touch the inner roller surfaces unless you are sure they are not scalding hot.
When replacing the fuser make sure it is fully seated and that both sides clip into place. In other printers it has been possible for the fuser to work when not pushed fully home but unpleasant noise and gear damage will result.
Maintenance Kit Warning Message
If the fuser life is coming to an end the printer gives warning messages. Fist it says maintenance kit life is low", by default at 10% . Then it says that remaining life is very low. By default this message happens 5% before the life actually ends on the M602 and 9% on the M603 reflecting the different usage expectations.
Also by default, the printer continues to work even when the maintenance kit is regarded as life-exhausted. In the Manage Supplies
menu the printer can be set to Stop, Prompt to Continue or just Continue.
On most sites continuing is preferable. Circumstances differ:
- Print quality is absolutely critical in some situations, and will decline at the end of the fuser life. It may be preferable to change the fuser than leave print quality to operator judgement.
- In situations like book printing or a warehouse despatch area production is disrupted when a machine fails. It may be preferable to force a maintenance kit change than have a problem half way through a job.
We don't actually know what algorithm M601 series printers use to determine the remaining life of a fuser. It might involve media type, media width varieties, page cover and so forth. We suspect it doesn't and is simply a page count. If that is so HP will give the maintenance kit warning "conservatively" somewhat before the fuser gives trouble. Printer brands don't like trouble as it generates tech-support calls.
Fuser Problems
If something in the fuser does actually fail the printer will shortly display an error such as Error 50.1
more on this shortly.
It is possible to get messages that seem to indicate a fuser problem for other reasons, such as a mistaken setting in a print driver.
The printer has two thermal sensors on the fuser and another (TH3) across a fan to get the environment temperature; it can sense the fuser motor turning and it has a paper detector to sense paper exiting from the fuser. The circuit diagrams show the M601 series can sense fuser current flow. However the printer doesn't actually know that the fuser foil is intact and it is vulnerable to odd things like a very heavily black page wrapping around the fuser film. Printers can be mistaken about problems.
Fuser problems can be user error, particularly inappropriate media.


Putting light grade office paper through with settings for heavy paper will cause ghosting (offsetting) for instance. A fuser that is too hot melts the toner rather than making it tacky so some sticks to the hot sleeve. A fuser that is too hot will also cause paper curl and possibly a wrinkled page (more here). 

Putting heavy grade paper through with settings for light grade will often seem to work, but toner will be rather inclined to crack away from the paper when it is folded. With heavy media the toner won't heat sufficiently and won't stick.
With a media selection that is to light, heavy or unusually thin the printer may also give "sub-thermistor" errors because heat is not moving around the fuser in a normal fashion.
Transparencies that melt in the fuser are the worst kind of wrong media. Melted transparency makes a horrible mess and probably does mean buying a new fuser. Select "transparency" in the driver menu before loading the tray and printing to transparent material. The printer then runs more slowly with a cooler fuser. Some printers attempt to spot user mistakes like using a transparency using lights and cameras but it costs a bit and isn't foolproof.

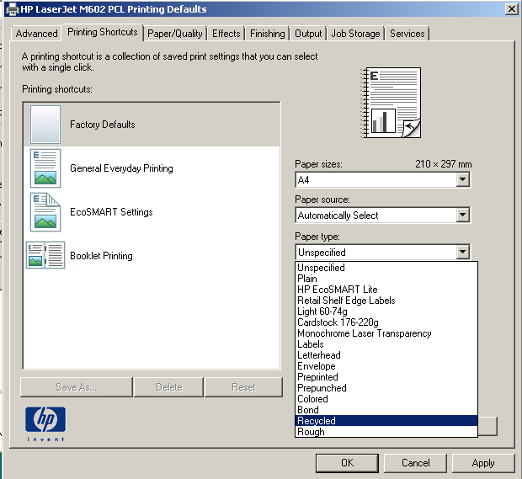
Media type settings in the driver - Shown here in a Linux variant. There is nothing explicitly to set the fuser temperature. the user specifies a media type such as "Cardstock" and the fuser will run hotter - and possibly the printer more slowly.
The same thing for Windows.
From the LaserJet 4000 through to the P4014 HP had some explicit fuser temperature adjustments. Those now seem to be absent (or hidden). We think they caused to much confusion and tech-support issues.
Fuser Modes
Laser printers can deal with quite a range of different print-media: bank paper through to card.
Ordinary office paper is normally the main product: if exceptionally thin or thick material or something with unusual thermal or electrostatic responses is to be used then the machine has to adjust.
Fuser modes were introduced with the LaserJet 8100 and then the LJ-4000. They work(ed) like this:
- A printer menu or print driver assigns each paper type a fuser mode.
- Trays are assigned a paper type.
Over time this was refined a bit so that the LJ-4100 had four modes: Low, Normal, High1 and High2. They are modes rather than temperatures because High2 sets the high temperature (~ 190 centigrade) but slows down the printer to give more time for media and toner to come to temperature and bond better - helpful for heavy label stock.
Unfortunately people didn't understand this process too well; (US Parts Supplier PartsNow explained it in 2005).
HP have sort-of changed things. Now you get offered a menu of paper types to which you can assign a print mode - and a resistance mode and humidity mode if desired. The notion of fuser temperature modes has largely submerged and is covered by the list of paper types.
Print drivers offer a series of media types and these are used to set the fuser mode and sometimes to adjust the print speed. Selecting "transparency" will typically set the fuser heater to run cool and the printer to run slow so that the toner is heated less but for longer. Which fuser mode is being asked for is indicated in fuser error messages.
One way to assign the paper types is via the printer's web interface. The web interface is generally more convenient for this sort of complicated setup because there is a lot more space to display the information.
Under Print > Adjust Paper Types
this displays a table of the paper types.
Under Print > Manage Trays
the paper types set up can be assigned to the trays available.
The LJ-M601 series gives you a way to find out if anyone now understands Print Modes. The Paper Path Page prints out the paper path statistics including print mode usage. How many printers have any setting that isn't the default?
Sometimes IT designers become obsessed with the idea that people won't understand things like "fuser temperature" and print speed, so they replace them with ideas like "bond paper" and "rough" - which are actually losely defined. As a result we don't actually know what the printer does for any particular setting and all anyone can do is experiment.
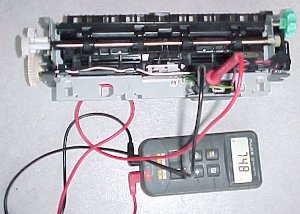
To prove a fuser heater has failed, or that the thermistor has failed use a multimeter to measure resistance. Heater failure is not unknown. Thermistor failure seems unlikely - they are very reliable components.
Signs of Death in Fusers
There are a few reasons fusers suddenly stop working.
- The silicone / teflon / metal sleeve degenerates, just as the teflon coated roller did in older printers. This is common and high recognisable, quite often fragments come out into the output tray - if not, take the fuser out and look inside. Rather than a smooth brown surface there is a ripped bit of fabric. This is the commonplace failure and seems to be akin to metal fatigue.
- The heater fails. This used to give
50.1
errors but all mention of them is now missing from the service manual. This failure might be due to a voltage surge but will eventually happen to anything that rapidly heats and cools. The heater in the LJ-M601 is a ceramic rod with a couple of metallised glass -coated traces and should prove robust. This is a less common fault; to prove a heater has failed measure its resistance. - It is not unknown for fuser bushings (bearings) to fail, giving a sudden grinding noise mainly because the cogs no longer mesh properly. This is rare in anything but refurbs.
- … and of course it is not impossible for fuser cogs to wear out. Those in the LaserJet 4200 were notorious for doing so when HP first introduced plug-in fusers. The problems seems to have died down, probably due to progressive design refinements. Make sure both latches on the fuser click into place.
There is also a long term decline in the fuser's performance as the non-stick abilities of the hot roller decline. Particles of toner begin to stick and rather than being brown and shiny is gets dull and toner encrusted. Ghosting or "offset" becomes more likely even at the right temperature. This is examined further below.
Bad print from a fuser is specially problematic. A typical problem is "ghosting" or "offsetting" where the page prints but echoes two or three times faintly down the page. However this problem can also result from using toners not designed for the printer (re-manufactured rather than HP toner). If the toner is not a good match for the printer in terms of melting point and built-in wax lubricant it might build up in the fuser.
We also think the pressure roller will decay with time. It is silicone rubber with an unspecified filler - probably iron oxide. These fusers have a pressure relief action initiated by reversing the fuser motor so constant pressure damage to the fuser roller might be less common.
The HP M601 / M602 / M603 service manual explains the makeup of the fuser code as 50.WX.YZ where:
| W= fuser error code |
| X= fuser mode |
| Y= previous sleep state |
| Z= next printer sleep state |
… which might make sense except they then try to have values for W of 2,3,4,6, … 10, 11 and 12 in a 6 digit code.
Research also shows that error codes such as "50.92.11" do happen in the wild, although the manual does not document them. On an old interpretation that might be High fuser temperature (sub-thermistor) - and would suggest the wrong kind of paper is selected in the print driver - see the stuff on "modes" above. Somehow in the M601 manual it went undocumented.
The LaserJet M604 troubleshooting manual lists the codes rather differently. It has new firmware of course, and we cannot say it applies - but it does suggest two other undocumented errors.
| |
| 50.2X.YZ | Fuser warm up failure. |
| 50.3X.YZ | Low temperature thermistor 1 |
| 50.4X.YZ | High temperature thermistor 1. |
| 50.6X.YZ | Drive circuit fault |
| 50.7X.YZ | Fuser Pressure release failure. |
| 50.9X.YZ | Low fuser temp 2 error. |
| |
| 50.10.YZ | Low temperature thermistor 2. |
| 50.11.YZ | High temperature thermistor 2. |
| 50.12.YZ | Fuser pressure release mechanism failure. |
Fuser Error Messages
Printers use a series of sensors to detect the progress of a page. Using it's sensors an M601 series printer is able to detect and report some fuser faults as "Error 50", particularly those related to problems heating up.
Internally a fuser is fairly simple - a heated element and a pressure roller. The heater softens the toner powder and the pressure roller forces it into the page.
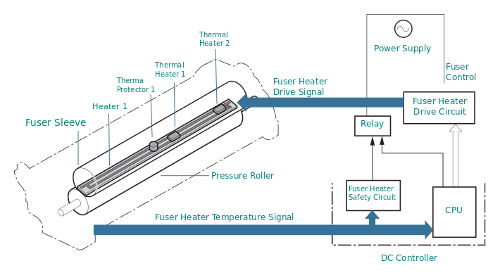
The printer controls the fuser temperature through a thermostatic loop. The heated ceramic bar has two metallic heater tracks and a thermistor placed about mid way. when the printer is used the formatter tells the DC controller to start things up and then gets on making the "video" for the page. The DC controller signals to the power supply to turn fuser power on and then periodically checks the value on the fuser thermistor. When the thermistor goes fractionally above the required temperature fuser power goes off, when it drops again power goes on. If the fuser never gets to temperature, for instance, that is an error. The DC controller signals the formatter, which reports the problem on the control panel and in the error log.
Sleeves and pressure rollers are more difficult to monitor, all most printers do is to see if the paper emerges. More sophisticated recent printers like the M602 have "secondary thermistors" which can spot hot or cool spots. More on this shortly.
Heaters have electrical characteristics that can be monitored by printer circuits; current draw, heating up in the expected manner. The error messages are derived from these things: what the formatter told the DC controller to do, what the DC controller told the power supply and then what is sensed in various ways and finally interpreted by the formatter firmware.
Errors on HP LaserJets used to be reported with a 3 digit code that was fairly consistent across the range. That changed when they moved to 4-line graphical displays. The old codes are (generally) still there but the numbers now come as three groups of 2 in the form 50.WX.YZ
- such as "50.2F.00" Longer codes give more information but they also confuse the issue and make it more difficult to find help on the Web because nobody might have had that combination before.
Interpreting Error Codes
Error codes are generated by the printer firmware and only HP know what they mean and what their intentions are. (Only a few people working on printer firmware truly know).
HP normally use the same error codes across most of their printers, there is more on themhere.
However HP seem to be "migrating" the fuser error codes to reflect the provision of extra thermistors, the ability of motors to detect when they are not spinning and the provision of a pressure release mechanism. Errors 50.1, 50.1, 50.7, 50.8, 50.9 have gone missing from the LaserJet M601 Service Manual (Part number: CE988-90945 Rev 1). However there is evidence (noted above) to suggest some still exist.
It takes bravery or folly to suggest HP might be wrong about error codes but actually we think the "thermistor 2" codes are more likely to be triggered by narrow media such as postcards and labels - local hot or cold spots are what the extra thermistors seem intended to sense. So "High temperature thermistor 2" might be interpreted as - set for ordinary A4 media but using narrow labels.
We suggest checking the media settings before anything else. Don't immediately buy a replacement fuser.
It is certainly wise to reseat connectors as suggested, However other than unplugging and reinstalling the fuser non of the connectors are user accessible - the side panels have to come off the printer.
HP keep on suggesting replacing the power supply - the M601 service manual calls it the Low Voltage Power Supply (LVPS). Now it is true that the LVPS has the connector for the fuser and the power-handling components which are the electronic parts most likely to go wrong. The DC controller is also involved, but since it is basically just a microprocessor and some RAM it is not likely to go wrong, whilst the power handling parts on the LVPS might. However in practice that seems to be rare. This printer has a heritage and predecessors like the LJ-4200, LJ-4250 and P4014 were not notorious for blowing up LVPS boards.
It is not in the least easy to replace the power supply in these printers; the strip down of the printer required to do it leaves you with almost nothing but a heap of bits.
An engine test might often be a good idea. The little button to initiate it is hidden on the right side of the printer at the bottom middle of the air inlet grill. If the printer manages engine test the fault isn't the DC controller or LVPS
What follows is largely based on what HP says in the M601 Service Manual, modified a bit by the M604 manual which seems rather better on some points and with our own commentary.
- 50.2 : Fuser warm-up failure.
- Reconnect the connector (J128) between the fuser and the DC controller PCA.
- Turn the product off. Remove the fuser and then reinstall it. If the error persist, replace the fuser.
- If the error persists, replace the power supply.
J128 is the big captive connector between fuser and power supply so essentially all they are suggesting here to to take the fuser out and put it back in again. The problem could be a bad connection - if your lucky. We'd examine inside the connector and maybe meter the connector.
- 50.3 : Low temperature thermistor 1
- Reinstall the fuser. Check the connector (J128) between the fuser and the product. If it is damaged, replace the fuser.
- Reconnect the connector (J82) on the DC controller PCA.
- Reconnect the connector (J62) on the low-voltage power supply PCA.
- Replace the fuser
- If the error persists, replace the low-voltage power supply
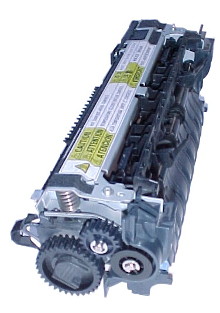
One track of the heater failed? Possibly a bad power connection within the fuser itself (the black and white wires just visible in the picture. The printer bases its estimate of temperature rise time on the environment sensor (thermistor) on one of the fan inlets (?) - so a dirty or blocked fan vent could be to blame. (Stopped fans should give 57 errors). Not plugging the printer directly into the wall is another issue - avoid extension leads because they can cause voltage drops. Don't use a UPS with a laser printer unless it is rated above 4KWH (few are).
- 50.4 : High temperature thermistor 1
- Reinstall the fuser. Check the connector (J128) between the fuser and the product. If it is damaged, replace the fuser.
- Reconnect the connector (J82) on the DC controller PCA.
- Replace the fuser
- If the error persists, replace the low-voltage power supply
How can a fuser get too hot? They do if the triacs in the power supply break down closed-circuit (which triacs might) because the DC controller can't shut the heater power off. There is a protective cutout in the fuser power circuit to shut the heater down before things turn nasty and the printer bursts into flames! A less worrying possibility is that the time estimate provided by the environment thermistor is wrong - for instance the printer is markedly colder than the room because it was just wheeled in from the warehouse. Utility power over-voltage is a possibility; the UK is supposed to have power at a nominal 220 Volts but it is almost never less than 240V and regularly over 250V in the North East. Plugging the printer into a UPS could do it as well because the weird waveform may upset the triac timing. Printers could get too hot if they do a lot of work, particularly if ventilation is blocked or fans are dirty. So turn the printer off and on again and see if the fault recurs.
- 50.5: Inconsistent Fuser or Wrong Type of Fuser .
The M601 and M604 manual say nothing about this error - but since the fuser shape has remained pretty similar since the LJ-4200 was introduced in 2002 we infer that the possibility of putting the wrong object in the hole still exists. DONT - but if you do we hope it doesn't simply go BANG! An error message would be better. The P4014 fuser definitely fits into an M602 but so far we haven't had the courage to turn it on. From Web reports we gather it works and gives an error message but firmware versions can differ and deliberate risk seems foolish.
- 50.6 : Drive Circuit Fault
- Check the power source and make sure it is the correct voltage and within the frequency range 40 to 70Hz. Fuser temperature control does not work properly outside this range.
- Reconnect connectors J51, J52, J53, and J162 and DC controller PCA connectors J85, J95, and J96.
- If the error persists, replace the low-voltage power supply
Drive circuits can certainly fail but it isn't a frequent issue. DO NOT use the printer with an Uninterruptible Power Supply (UPS) - commonly used to keep the computers going in the event of a power cut. A laser printer momentarily demands a current equal to ten or twenty computers to run it's fuser and unless the UPS has incredibly generous power rating it will make bleeping noises - and both it and the printer will do weird things.
- 50.9 isn't mentioned in the M601 service manual but it has been spotted in the wild as "50.92.11" and it is there in the M604.
- 50.10 : Low temperature thermistor 2
- Reinstall the fuser. Check the connector (J128) between the fuser and the product. If it is damaged, replace the fuser.
- Reconnect the connector (J62) on the DC controller PCA.
- 50.11 : High temperature thermistor 2
- Reinstall the fuser. Check the connector (J128) between the fuser and the product. If it is damaged, replace the fuser.
- Reconnect the connector (J62) on the DC controller PCA.
- If the error persists, replace the power supply
- 50.12 : Fuser Pressure Release Mechanism Failure
- Reinstall the fuser. Check the connector (J128) and the DC controller PCA connector (J62).
- Check the fuser pressure release sensor flag. If it is damaged, replace the fuser.
- Reconnect the fuser motor connector (J221) and the DC controller PCA connector (J89).
- Use the Component Test item in the Troubleshooting menu to test the fuser motor. If the motor fails the test, replace the fuser motor.
- If the error persists, replace the fuser.
Fusers can also go wrong in ways the printer can't fully detect. The fuser sleeve is the most likely issue. There is no specific mechanism to monitor the integrity of the fuser sleeve.

The teflon coated sleeve in a fuser can become damaged and this will tend to cause regular marks on the page, near the edges of a page at first. This wear pattern is sometimes called edgewear
. The problem seems to arise because of the uneven distribution of stress contours across the fuser - they are greater at the edges because of the 0.1mm displacement caused by office paper. Thick papers may give edgewear patterns earlier in the fuser life.
Fuser rollers and the sleeve in the M601 series can get contaminated or damaged. A typical contamination problem might be envelopes or sticky labels where some glue residue sticks due to heat in the fuser. The fuser will then make an irregularly shaped splodge on the page at intervals of 94mm (which is the diameter of the fuser rollers). It is possible to clean marks off a fuser sleeve- try soapy water applied with a cotton bud first and if that doesn't work try isopropyl alcohol ( IPA) as a solvent.

Later the sleeve will degenerate entirely and bits of it may emerge from the printer. Pages may still come out, but the toner-powder doesn't stick to them properly.If the sleeve degenerates to the point where paper can't move then the paper exit phto-interrupters won't work at the right time and the printer will give a paper feed error.
This problem is usually quite easily spotted if you take the fuser out - the sleeve is visible inside the fuser and the marks and rips in it are self evident.
Fuser Repair
If you are quite clear that you have a damaged fuser then the normal answer is to buy a replacement fuser (110 Volt for US and Japan), (220 volt for UK, EU)and the European versions are available on this page.
If the printer won't print a configuration or supplies status page because the fuser is dead have a look at its internal web server (you may need the IP address) and that should give statistics on maintenance life.
Whether you would prefer a new fuser, a refurb, compatible or even just the parts to fix the fuser is something we look at below.
If the fuser is replaced then it might be an idea to reset the maintenance count.
Fuser Principles
Fusers can be repaired; a refurbished fuser is one that has been repaired. Repairing a fuser is not quick and simple; doing the job needs information about how it works and a source of reliable parts.
")
Traditional fusers use a heated roller. This is an aluminium roller with a heater like a halogen lamp mounted in the middle. When the printer starts it heats the roller but to do this it has to turn the lamp on then run the motor for a minute or so. When the printer might be used the fuser is kept hot by turning the lamp on for ten seconds or so every minute and turning the motor a bit. The fuser is allowed to cool when the printer goes into power-save mode but it will then need a minute or so to warm up when the user sends a print job.
Instant-On Fuser
HP/Canon devised the "instant on" fuser used in almost all their recent printers in the late 1990s. The heated roller is replaced by a ceramic heater that only powers up when it is needed. The heater is pressed firmly against the page by springs working against the pressure plates so that it can transfer enough heat.
The print would smudge, except that the fuser is wrapped in a Teflon sleeve that rotates with the pressure roller and the page. The sleeve is made of polytetrafluoroethylene material, in these printers it is on metal backing. Because very little heat is stored in the sleeve the fuser can simply be turned on whenever it is needed - unlike older fuser designs. It is rather surprising how well the instant-on sleeves work, they last about as long as the old Teflon coated rollers did.
Fuser Monitoring
The fuser carries two thermistors to detect it's temperature, one in the middle (TH1) and another at one side (TH2 gives the 50.8 and 50.9 errors). The temperature is driven high quickly as a print-job starts; if the expected temperature change doesn't happen a failure to warm up or a high temperature will result in an error message and the printer stopping.
If the control circuits go berserk and the fuser starts to overheat a thermal cutout isolates it. The message then is thought to be 50.6.
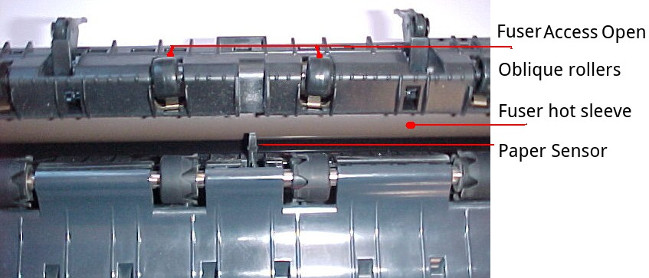
The fuser has a photo-interrupter to detect paper delivery (PS700)
The fuser is not a complicated mechanism; it has a repertoire of faults: the reportable "error 50" issues, observable print defects and a few possible misfeed issues.
Fuser Faults
Fuser faults that result in it not warming up properly or overheating will be detected by the thermistors and result in a 50.x error. If the problem was a temporary power-brown out or a bad contact then turning the printer off, waiting, then turning it back on might clear the fault.
Fuser non-stick sleeve degeneration will first result in a regular pattern corresponding to the marks on the fuser sleeve or pressure roller. The printer has no sensor that can detect this - however:
- Marks on the paper will be at a characteristic 94mm spacing down the page.
- It is possible to take the printer out and spot the problem. The foil is visible through the slot where paper enters and can be turned by the large cog.
Ultimately failure of the sleeve will result in paper misfeeds, and when it degenerates completely the problem will probably be evident in material gathering in the rear output bin /door.
Fuser and Mis-feeds

Misfeeds are also moderately likely in the fuser in the "normal" course of events - as they are throughout the paper path.
Fast printers give some problems identifying the cause of misfeeds. The paper takes about a second to move from the tray to the top of the printer and by the time one page is going through the fuser the next is under the cartridge drum and the pickup roller is turning for the next. Problems that look like paper jammed in the fuser might actually be a failure to pick up the next page that caused the printer to halt.
The fuser sleeve is lubricated with high temperature grease to allow it to move fairly freely. If the grease is wrong in some way then the sleeve will not move well - or at all. This may be detectable with the fuser out of the printer. It is never particularly easy to turn the pressure roller cog (and harder still when the fuser is cold) but an exceptionally stiff roller or one that isn't turning the foil would be suspect. There are some ideas on why this might happen below.
The fuser has two opto sensors. PS700 is the exit sensor. If it fails to operate at the correct time the printer will stop. The sensor is worked by a flag and a lever and sometimes a previous paper jam dislodges the flag. A few fusers are notorious for giving problems due to bad opto-sensors.
The rollers in the fuser are hot and not unknown to get labels or even whole envelopes stuck to them. I have seen fusers with envelopes so neatly wrapped around the roller that it looks as though it were designed that way. The fuser may give temperature errors - but it may succeed in working well enough to give a misfeed.
The fuser sleeve is delicate, the slightest tear will spread and destroy it. Also when the fuser has been used in the last few minutes its parts will be hot. Be wary of touching it.
With the fuser out of the machine and cold the pressure roller cog should move evenly, though not necessarily easily. The sleeve material should rotate as well. There should be no sudden sticking points.
A possible cause of sticking points is that the fuser lubricant has dried in an odd pattern. It isn't clear how (or if) the lubricant is distributed in an HP factory - we don't think fusers are actually given a live test.
With refurbished fusers practices no doubt vary. Unfortunately the way the industry operates makes refurbishing processes rather opaque.
A suggestion is that all new fusers and especially refurbished units should be run for at least 200 pages on installation. This will make sure the lubricant is thoroughly distributed. Historically an engineer wouldn't leave a printer where some major work had been carried out without giving it that sort of test, but practices have changed as cost and time constraints have tightened.
Other possibilities are:
- Paper may deflect before it reaches the fuser and hit the paper guides round about. This is likely to be due to a dirty contact somewhere in the print cartridge well or the static discharge path. Very flimsy paper also does this, it bends to easily in an electrical field. The misfed page is likely to be crumpled like a concertina at its leading edge.
- Both fuser sleeve and pressure roller have electrical contacts. If the voltages are wrong there could be misfeeds as well as image quality problems and a buildup of dirt on the fuser rollers. It is difficult to check any of the high voltages in the normal course of events of course, and those on the fuser aren't very accessible.
- Timing of pages might be bad due to problems with pickup and feed or more likely with the registration / pre-transfer roller. Misfeeds like this are likely to be sporadic and the position of the text on pages that do emerge is likely to be a bit erratic - some pages will miss print off the top of the page, others off the bottom. Intermittently one will jam in the fuser. The true fault is likely to be the registration station sensors just before the cartridge.
Web Research
Supply Situation
CB388A here.
New Fusers
.
The remarks on pricing and availability are guidelines based on our knowledge of the market in September 2014. Our prices change with distribution lists - see the catalog.


")


