(July 2020)
Two obvious scenarios spring to mind (although there are others):
- Want an additional monitor, but have no spare monitor port.
Could use USB to HDMI adaptor (£20), but many are tricky (often impossible) to get working with Linux. Diamond Multimedia make some that do work with Ubuntu, but they are £50. - Want to reach a display further than 15 metres (the approx. max length of a HDMI cable)
You can use booster or repeater (£10 – £100), but can be problematic.
This solution effectively configures the Pi as an X-Terminal, or Thin-Client, that boots straight into a logged-in X-Desktop, which we can use as the destination display for locally running applications.
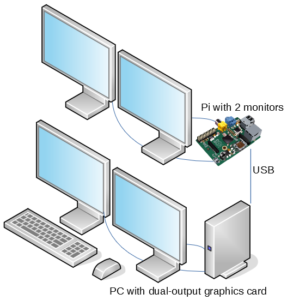
Communication between a local PC and the Pi can be either over an Ethernet network cable (optionally with a central network switch) or over a USB cable directly linking the Pi to the PC. The intention is that the final solution is as near plug-and-play as possible, i.e.
- Plug the Pi into a USB3 port on the PC
- The Pi is powered by the PC, and boots – configuring itself as a USB Ethernet Gadget, which the PC can reach via a static IP address
- The Pi boot sequence automatically logs in a default user and starts an X Desktop session
- A user on the PC can launch graphical applications to be displayed on the Pi’s monitor, e.g. by running
DISPLAY=10.55.0.1:1 chromium-browser - User can optionally interact with the application, either by using a keyboard/mouse directly plugged-in to the Pi, or by using Barrier (fork of Synergy) keyboard & mouse sharing software.
Which Pi?
As we need the Pi to function as a USB gadget, we need to use either a PiZero, PiZeroW, PiA, PiA+, Pi3A+, or a Pi4B. On the Pi4B, only the USB-C connector can be gadget-enabled. Note that this is where the Pi4B normally draws its power from, however it can also function as a USB-2 (not USB-3) gadget port. The rest of this write-up is based on a Pi4B (we plugged two additional 1920×1200 24″ monitors into the Pi’s micro HDMI ports).
The Pi 4 draws a lot more power than the Zero, so it may not be sufficient to power it over USB. A workaround is to add a PoE Hat.
Enabling USB Gadget Mode
There are two methods of gadget support – a legacy version requiring separate kernel modules for each function (ethernet, serial, video, mass storage etc.) and the newer libcomposite driver route, which moves configuration to userland – via ConfigFS, a virtual file system in /sys/. The latter is the preferred way, but be aware of forum threads you find on the web which are not always clear as to which they are using.
To enable composite gadget functionality (on Raspbian 10 – Buster – with kernel v4.9):
Add dtoverlay=dwc2 in [pi4] block of /boot/config.txt
Add modules-load=libcomposite immediately after rootwait in /boot/cmdline.txt
The shellscript rpi4-usb.sh is an excellent resource. Running this checks that all is in place, and creates a /root/usb.sh script which can be run (as root) to start the ethernet gadget. However by default the created /etc/dnsmasq.d/usb file sets a DHCP range of 2-6, whereas we want to ensure a single, fixed address is issued. So, before running /root/usb.sh, change the appropriate line in /etc/dnsmasq.d/usb to
dhcp-range=10.55.0.2,10.55.0.2,255.255.255.248,1h
Once the ethernet gadget is running (check with ip addr), check that you can connect into the Pi4B from the PC (ssh 10.55.0.1 )
Allow remote X applications
The Xserver on the Pi4B needs to accept window requests from the PC, so forward X traffic arriving on TCP port 6001 to the X11 socket:
socat tcp4-listen:6001,reuseaddr,fork unix-connect:/tmp/.X11-unix/X0
(Note: if socat is run as root, we also need to permit root to launch X apps: xhost +si:localuser:root)
From the PC, send X traffic to screen 1 (port 6001) on the remote Pi Xserver:
DISPLAY=10.55.0.1:1 xterm
 DISPLAY=10.55.0.1:1  chromium-browser
 chromium-browser --display=10.55.0.1:1
 firefox --display=10.55.0.1:1 -new-instance
(Sometimes have to disable hardware acceleration in Chromium, otherwise get a blank screen)
Configure the Pi4B to automatically log in as a default user and start an X Desktop session.
Use sudo raspi-config and under Boot Options -> Desktop/CLI, select Desktop Autologin
Configure Barrier (v2.3.2)
Note change of screen name – Barrier does not like hyphens in a host name.
On the PC (the Barrier server):
sudo apt install barrier
- In Barrier ChangeSettings untick SSL, Enter interface address 10.55.0.2
- Configure Server: Drag extra monitor onto grid, double click it and name it “pi4b”
- Click Start
On the Pi4B (the Barrier client):
sudo apt install barrier- In Barrier ChangeSettings Enter Screen name as “pi4b” and untick SSL
- Tick Client (use another computer’s mouse and keyboard), untick “auto config” and enter 10.55.0.2 as the Server IP
- Click Start
- In the barrier log on the server (view by pressing F2), you should see a client “pi4b” has connected message.
- Barrier->Quit (to save settings)
- Relaunch Barrier
Automate
To automatically start the remote Keyboard/Mouse service and accept remote X applications:
sudo vi /etc/systemd/system/barrier.service
[Unit]
Description=Barrier Client mouse/keyboard share
Requires=display-manager.service
After=display-manager.service
StartLimitIntervalSec=0
[Service]
Type=forking
ExecStart=/usr/bin/barrierc -n pi4b 10.55.0.2
Restart=always
RestartSec=2
User=pi
[Install]
WantedBy=multi-user.target
sudo systemctl daemon-reload
sudo systemctl start barrier.service
systemctl status barrier.service
sudo systemctl enable barrier.service
sudo vi /etc/systemd/system/socatx.service
[Unit]
Description=Forward X traffic arriving on TCP port 6001 to the X11 socket
Requires=display-manager.service
After=display-manager.service
StartLimitIntervalSec=0
[Service]
Type=simple
ExecStart=socat tcp4-listen:6001,reuseaddr,fork unix-connect:/tmp/.X11-unix/X0
Restart=always
RestartSec=2
User=pi
[Install]
WantedBy=multi-user.target
sudo systemctl daemon-reload
sudo systemctl start socatx.service
systemctl status socatx.service
sudo systemctl enable socatx.service
Further Notes
If your’re struggling to double-click the mouse quick enough, create a /home/pi/.gtkrc-2.0 containing
gtk-double-click-time=500
gtk-double-click-distance=20
If you’re a Xubuntu user and wish to run remote thunar file manager sessions on the Pi, you may find that the directory icons are missing. To fix this you’ll need to change the desktop icon theme on the Pi:
sudo apt install elementary-xfce-icon-theme- Run
lxappearance(from command line session), then- select Icon Theme: elementary Xfce
- in the Other tab, check “Show images in menus”
Some X applications (such as yad) may fail with an error:
libGL error: failed to open drm device: No such file or directory
libGL error: failed to load driver: vc4
To workaround this, export LIBGL_DRI3_DISABLE=1 before launching the application.